Module Sets: Specialized Categories


Module Sets: Specialized Categories

When you make a module set, the left hand window has a search function that will search all filenames and filter all files to only those fitting the search criteria. You can use this to make specialize Module Layout Sets in an easy way.


Step 1: In Windows File Explorer, examine your files. Here rename the files of a specific category, say files dealing with the “Atonement”, and add a special unique code to identify the file as belonging to that category.

Let’s take the atonement category. On my website, you search for that category. Simply find a single file that has the topic or category you are looking for and examines the different parts of the post.

module-sets-making-category

Note on this image the various parts in blue. First of all, there are “Categories” under the Title. You can click on that category link and see all in that category. Second, there is a series tag which is seen in “This entry is part 2 of 11 in the series Salvation-Atonement“. This is the same as the list in the box “Salvation-Atonement”. You can Control+Click on each of the modules in the box and a separate browser tab will open with that post in it. You can also just type in the topic in the search box at the top right of the sidebar.

More Articles from this Category


Method One: Series tagged: Salvation-Atonement http://www.twmodules.com/series/salvation-atonement/
The series available are in the right-hand sidebar, so click on Salvation-Atonement link. Note that these change constantly. So as they grow larger (more than 40 files), I am splitting them into more specific categories, like I recently broke the atonement modules off from salvation where they were before.

Criteria: I tag these by hand, so I can miss some, or miscategorize a book or two sometimes.

Method Two: Category tagged: http://www.twmodules.com/category/atonement/

Note that this is a valid category from the website, and by just adding “/category/” you can access the website and these modules.


Criteria: I also tag these by hand.

 Method Three: Searching the website. In the search box in the top right-hand side at the top of the sidebar, there is a search box, and you can search on the files on the basis of your word.

Criteria: The only way a module will end up in a search is if the search word is actually in the post somewhere.

Note: As with all of these methods, there is a margin for error. Sometimes the search word appears in the post, but the module is not about that subject at all.


Once you have downloaded the modules that you want for a category module set (or select them from your list of modules), you can easily prep them for the Module Layout Set. Here, just add to the filename the identifier you decided on. Here I added (atone) as my identifier, and put it right after the filename (see below). Surrounding the identifier with parentheses “()” makes it harder for some other module to mistakenly be included.


simpson-divine-healing-in-atonement(atone).gbk.twm
barnes-atonement(atone).gbk.twm
winslow-atonement(atone).gbk.twm
owen-death-of-death-in-the-death-of-christ(atone).gbk.twm
best-the-saviours-definite-redemption(atone).gbk.twm
candlish-atonement(atone).gbk.twm
pink-the-satisfaction-of-christ(atone).gbk.twm
haldane-doctrine-of-atonement(atone).gbk.twm
skinner-another-look-at-the-lamb-of-god(atone).gbk.twm


denney-the-death-of-christ(atone).gbk.twm
denney-the-atonement-modern-mind(atone).gbk.twm
boettner-limited-atonement(atone).gbk.twm
dabney-christ-our-penal-substitute(atone).gbk.twm
boettner-atonement(atone).gbk.twm
pink-doctrine-of-reconciliation(atone).gbk.twm
bronson-the-extent-of-the-atonement(atone).gbk.twm
machen-doctrine-of-atonement(atone).gbk.twm
candlishr-the-atonement(atone).gbk.twm


Within theWord, make a module layout set.

See How to Make Module Sets

Then search in the left panel for “(atone)”. This will quickly make a layout for atonement. As an alternative, you can also make a doctrinal layout set, and have these in a folder within that set.



Specialized theWord Study Area

Specialized theWord Study Area. Today we live in a day when most people have huge hard disks. Space is a luxury most people have. In this post, I just want to share with you something that I have been doing for years. It works really well most of the time. What I am talking about is physically making a tw installation on your computer for just a specialized study. What we are going to do is to set up an area with just certain modules.

What I am suggesting here can also be done with Module Layout Sets. So this is not the only way to set up something similar.

Continue reading Specialized theWord Study Area


Installing theWord on Mac-Linux-Ubuntu

I will be open about this, I don’t have a linux machine nor a Mac. But from the feedback from the many people who have installed theWord on these platforms it is fully possible to install and use the program on these platforms.

NOTE: Being a Mac or Linux user, you should be aware of the possibility of using Windows programs on your platform via a WINE (Windows Interpretation and Emulator). This WINE program is also free. These programs are platform specific, and they allow you to install theWord program on your machine. It is possible. Continue reading Installing theWord on Mac-Linux-Ubuntu


Using Inline Commentaries


CLASS OBJECTIVE: In this tutorial class, I will show you how to use theWord inline commentaries function.


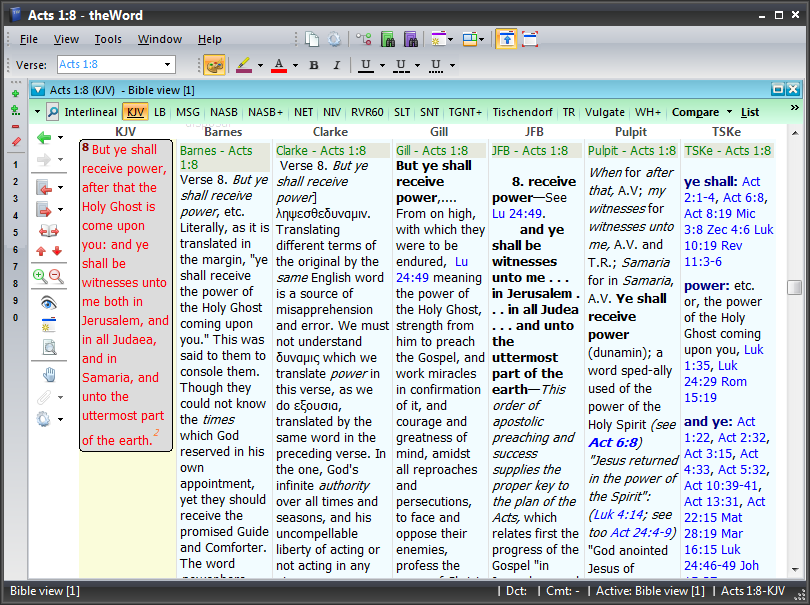
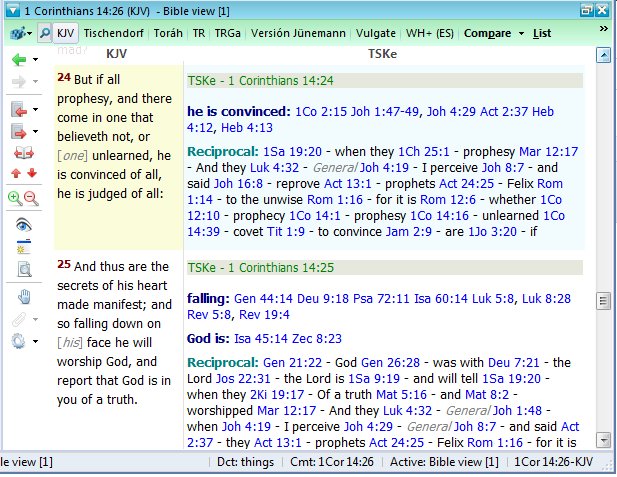
What you see below is a simple BibleView window (KJV on left, commentary on the right). What makes this such a powerful tool is that you can set your commentaries in this inline commentary function, and you can read through/study through a passage of Scripture and read the commentary with it quickly.

Before we get too involved in this one, there is a short-cut  key to do this, which first is clicking in the BibleView Window you want the commentaries to appear in, and the typing a single letter:

N – Toggles the commentaries off (hides them).
C – Shows the commentaries below the Bible verse.
T –  Show the commentaries besides the Bible verse (see image above for an example of this).

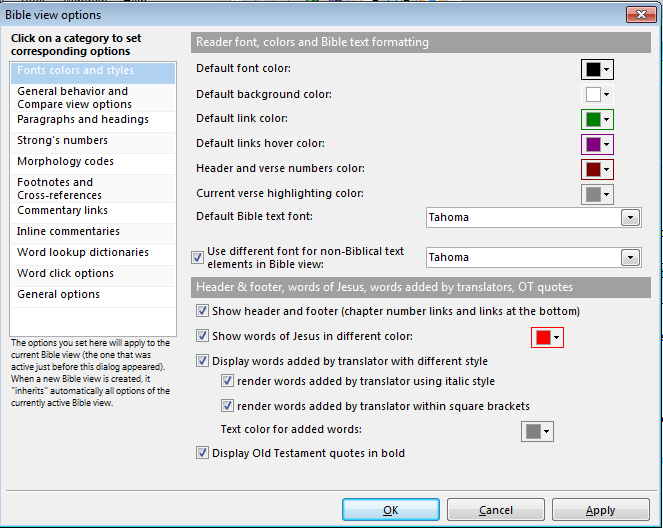
Note that there are two very distinct things here, your quick access to BibleView functions and options, and a full access to the options involved. If you click on the wheel or cog, then you get the full access to set the BibleView Window options. If you click on the down arrow beside the wheel, you will quickly activate or deactivate (hide or show) one of these functions.


Once having activated the BibleView Window (clicking in it), then you press Control+O to get into the toggle to show this. At this point, you should see something like this.


Now we want to click in the left-hand window to get to inline commentaries section.

More Articles from this Category

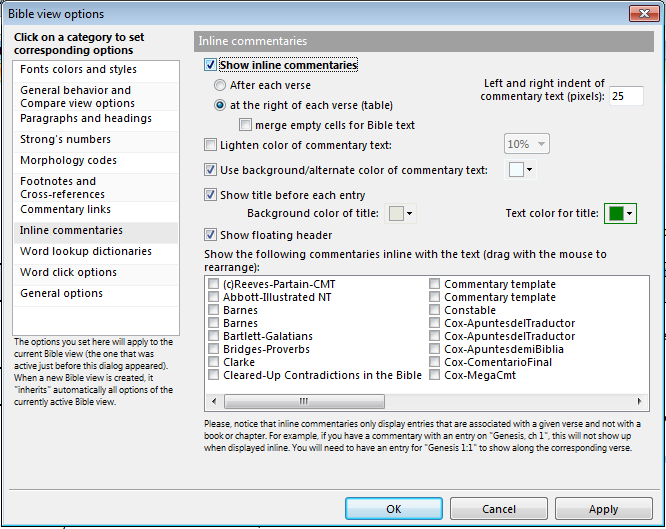
What we see here are the settings for the inline commentary. (Above to activate it by short cut keys, and here in this dialog box you click the topmost checkbox to activate or deactivate it.

You can play with these options to change the “look and feel” of the commentary, but the important point here is that in the mini-window with the listing of your installed commentaries, you can check off the ones you want to see in the inline commentaries.

Note: You see double commentaries because you have more than one installed. In my case, I have some of these commentaries in a “commentaries” folder, and some in the main “books” folder in this installation, and as such, they appear twice. Don’t let this bother you. You can delete the redundant ones if you so desire. It doesn’t hurt to leave them either.


Here I am going to check off my recommended commentaries:

Recommended Commentaries

Click link name of the commentary to go to the download page for that module. All these commentaries are free by the way.

So this (below) is something like what it looks like:

The power of theWord is seen when you set this up, and can quickly scan through a passage and see various different commentaries quickly on a given passage. theWord saves you time, gives you power. Study the image above. This is really a great, powerful tool for Bible study. You cannot underestimate how much you can do with these tools!

Conclusion

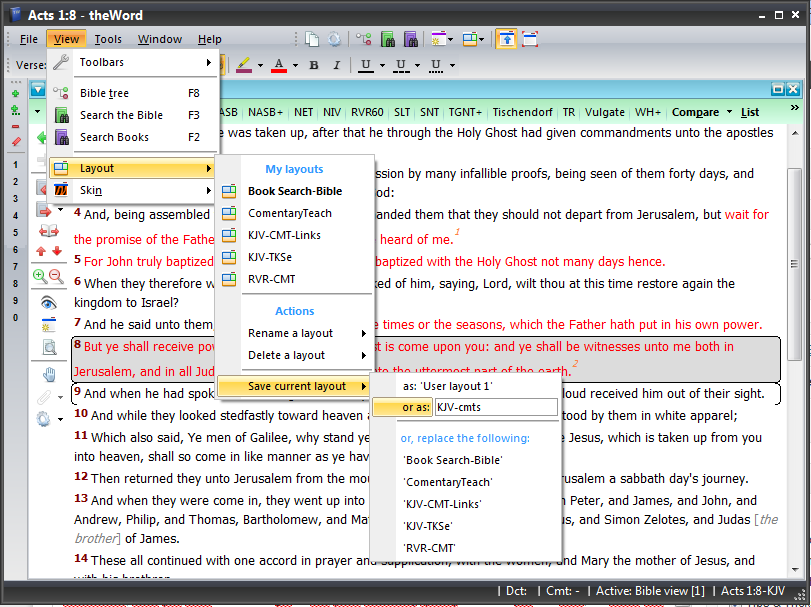
Remember, what you want to do is to get to this point extremely quickly. So once you are here, To make this into a screen layout, Go to the main TW menu, View-> Layout -> Save Current Layout – (name it)


This video goes through making a text sermon using the Commentaries inline.

https://www.youtube.com/watch?v=JeBXJCgIAmY