theWord Bible Search
By David Cox
Class Objective: In this class we want to just get started on searching the Bible. For purposes of simplicity, we will use the KJV Bible version, but I will also show you how to change that to any Bible version you have installed. theWord Bible Search is the topic of this class.
Requirements for this Class
First of all, you need to know how to open a BibleView window, and a Bible Search Window, so you should review Identifying the Panes, specifically the section “How do I open these panes if they are not showing?”
Setting up TW for a Bible Search
Open a BibleView window (F11), and a Bible Search window (F10). We will go through the different options, but for now try to get the window to look like this. Note that the 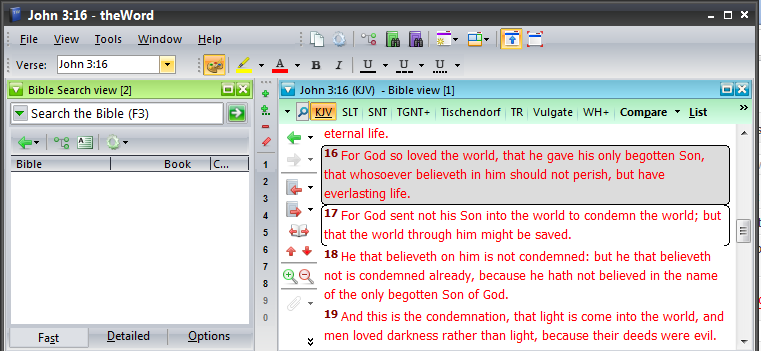 Let’s do a simple search. Click in the area that says “Search the Bible” or press F3. Type Abraham, and press enter. You should see something like this…
 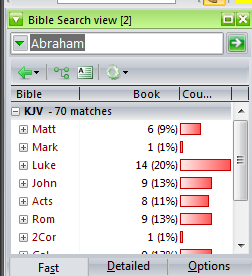 Note that beside the Bible version (in this image, it was searched on the KJV), there are the number of hits or matches. Below that are the individual books (Green OT, Red NT), with the total number of times encountered and what percentage that makes up of the whole with a bar graph. This is going to tell you quickly where the most and least mentions of your word are found.
Dagg Manual of Theology is a theology work in 2 volumes by J.L. Dagg a Reformed Southern Baptist. It is an extensive, very ample presentation of doctrines.
This is an extensive Bible Systematic Theology (Bible Doctrines book) from a conservative point of view.
Read/Download: now with pdf download link. 50,000 views on this page with download link
Problem: What? Abraham isn’t mentioned in the OT?
Of course he is, but we didn’t have the OT included in the search. So let’s do it again, but this time, let’s make it the entire Bible. There are three tabs at the bottom of this little pane, and they are “Fast”, “Detailed”, and “Options”. Currently we are in “Fast” where the results are listed. So here what we want is “Detailed”. Click on “Detailed”. 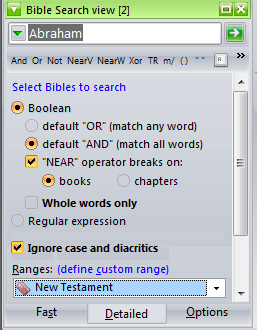 Here we have some basic options. The Boolean option allows us to search for more than one word, using a standard “either… or” or and “one and the other” option. The “OR” option is going to pick up either of two or more words. So let’s click on Abraham, and add to that “Abraham Abram” NOTE: For this search, make sure that the ( ) Or radio button is clicked. For now we will skip the NEAR operator (see Advanced Bible Searches: Near).
Whole words only.
Actually this wouldn’t apply on searching for Abraham, but something like “love”, “loving”, or just “lov”, it might. We will also skip Regular Expression for now.
Ignore case and diacritics
This will find “lord” and “Lord” equally if checked.
Ranges: Define Custom Range)
This is what we want. Here click on “New Testament” and you should see the following image. 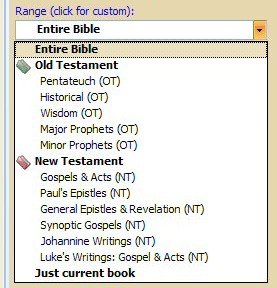 Here you have a lot of different groupings of Bible books to play with. What we want is the “Entire Bible” one at the top.
Searching on Custom Ranges within the Bible
Before we leave this pop-up, there are a very few people out there that are doing very detailed and specific studies (like for Masters or PhD dissertations) that need to be able to do searches on very specific parts of parts of books of the Bible. This is very easily done in TW by clicking on the hyperlink “click for custom” after the “Range” (in the above image, it is right above the words “Entire Bible”). 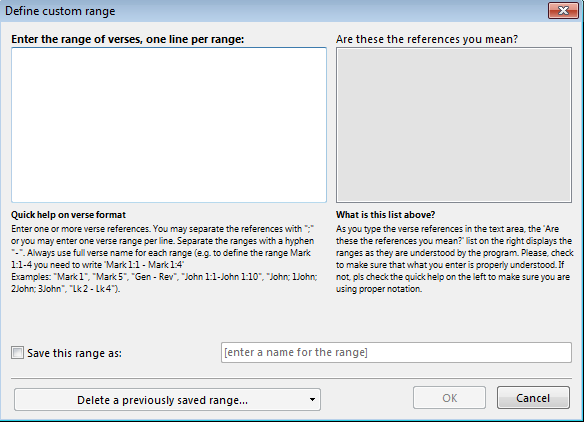 You type your verse references in the left screen, and TW will try to interpret them for you in the right. You can save these as a custom defined range. Before we finish here and search, click on the “Options” tab. Then look for the text “Show ‘Is this what you are looking for? box'” checkbox. Also, click the checkbox below it “Keep it visible at all times”. Then click on the Fast Tab and the green arrow on the far right of where we wrote “Abraham Abram”. PROBLEM: I don’t see the search text “Abraham Abram” nor the green arrow to the right of it. Okay, you are probably still in the Detailed or the Options tab, and you NEED TO CLICK ON THE “FAST” TAB before you actually do the search.
 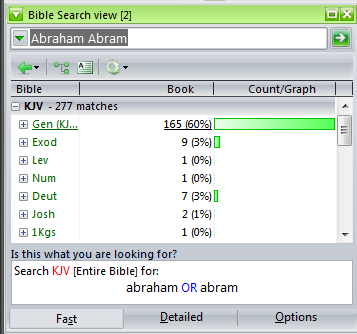 Now the OT verses are included. There are 277 matches for verses having one or both of these words.. Do you see the help box at the bottom? It has “abraham OR abram”. This is a great help for the novice TW user. Leave this setting on for a couple months or until you get the hang of doing these searches.
Expanding and Viewing Search Hits
Now we are ready to start doing some serious studying. First of all, make sure a BibleView window is open (F11). Now notice that the search results are in a tree format, with the top of the tree being “KJV 277 matches”, and then each book of the Bible being a branch (node is the correct term I believe). Notice the plus in the box before the books of the Bible. You click on these to expand or collapse them. So click on the “Genesis” node/branch to expand it. 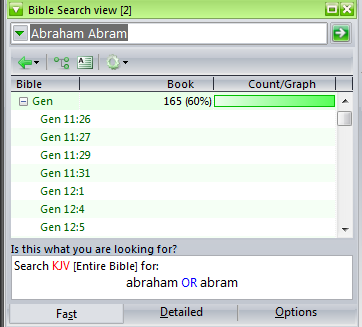 Okay, we are getting there, but I am still not too impressed. Each of these search results hits are categorized by book. So just mouseover any of them and you will see a popup with the text of the verse. Click on any of them and the last BibleView Window you visited will go to that reference. But this is still too much work for us. What we need is to see a listing of each and every verse. There are 4 small green icons about where the black word Bible is (above where “Gen” is in the above image). Let’s play with those for a minute.
Bible Search History
For each session (times between closing down theWord and your computer and starting it up again) you have the ability to repeat your searches. Depending on how simple or how complicated your searches get, this is a life saver. So the first icon (a green arrow) is going to allow you to redo your searches. Clicking on the dropdown box (black triangle beside the green arrow), will allow you to selective choose which one you want to repeat. These searches pick up what Bible version you were in when you did the search, so that is inherent in the history. 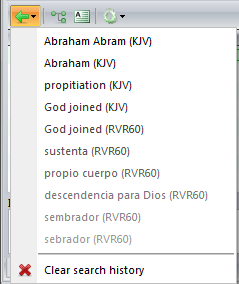 Here you can see my searches going back a couple of days. At the bottom, a button to clear the search history. There is an option making your searches persistent between TW sessions, or erasing them after each session. Remember the “Options” tab? go there and look at the bottom for the following.
  Here you have the options to make the search history separate for this BibleView Window, to delete it on exit, and how many search items are kept. Quite frankly, the bells and whistles of theWord is just a tall head and shoulders above even the best commercial programs out there. Costas has done an excellent work here paying close attention to a lot of details. Poor ole e-Sword lacks any kind of attention like this. Where e-Sword has 1-2 options, theWord will have 20-30 as a general rule.
Bible Search Results Nodes and Seeing Verses
Getting back to the four icons at the top of the Bible results area, click on these two middle icons now. ![]() Here you will see the left icon toggles the nodes collapsing them all, or expanding them to where you left off last, and the paper with an A icon will allow you to see the verses in the results window. With the “see verses” icon now toggled “On”, click on the far top right expand window to desktop icon. A green box beside the “X” to close the Bible Search window. You shoud see your verses nicely now. Click on the black bar in the title bar (same line as “Bible”, “Book”, “Count/Graph”) and drag it over to better use the space. You should see things like this…
Here you will see the left icon toggles the nodes collapsing them all, or expanding them to where you left off last, and the paper with an A icon will allow you to see the verses in the results window. With the “see verses” icon now toggled “On”, click on the far top right expand window to desktop icon. A green box beside the “X” to close the Bible Search window. You shoud see your verses nicely now. Click on the black bar in the title bar (same line as “Bible”, “Book”, “Count/Graph”) and drag it over to better use the space. You should see things like this… 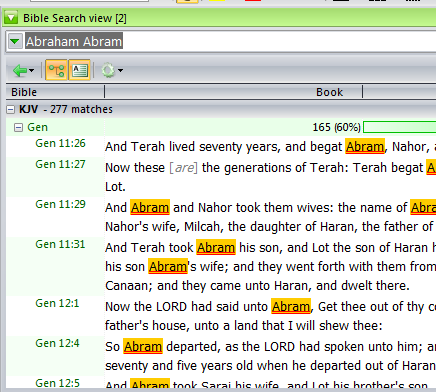 Now we are cooking! I now have all 277 verses in a list so that I can clearly see each verse, and read it. If I click on the now double square in the far upper right hand corner of the Bible Search window, I can put my Bible View window beside it, and clicking on any verse will move the Bible View Window to that reference to read the context. But wait a minute, we are not through yet! I like this. so if you are a typical impatience American like me, you are happy until you open your Word Processor and start looking at getting some or all of these “Abraham” verses over to your Microsoft Word sermon. How?
Copying a Verse to the Windows Clipboard
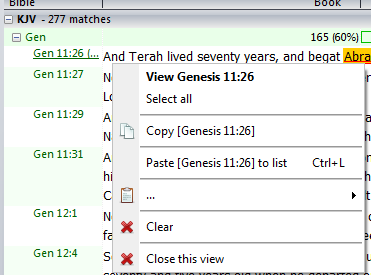 First thing you do is selective copying a single verse. So right click on the verse you want. You can copy that verse to the Windows clipboard, Choose “Select all” and then right click again, to copy the whole list to the Windows Clipboard, “Pasting” here? What? For now, skip that one. If you are really interested in this, then you need to finish this class and jump to Bible Verse List Feature, a future class. In brief, what this does is to open a list of verses for your Bible window, where in you can selectively add verses to that list. The “Clear” command clears the current search, and “Close this view” will close the current Bible Search Window, so probably leave those two alone.
Researching and Studying within theWord
Okay guys, so the idea is to stay in a single program as much as possible, and not be jumping back and forth like crazy. TW lets you do this. Open a new BookView window (F12) and make a topic (chapter Ctrl+N). (See Create a New Book Module for more help.) I named my new module, “David Cox’s Abraham Study.” You need to have created at least one chapter in it to start using it for this demo. Now go back to our Bible Search results window, and right click on the verse you like. See the clipboard icon in the right click popup with the ellipse (three periods like this” …”)? Move your mouse over it. You should see something like this. 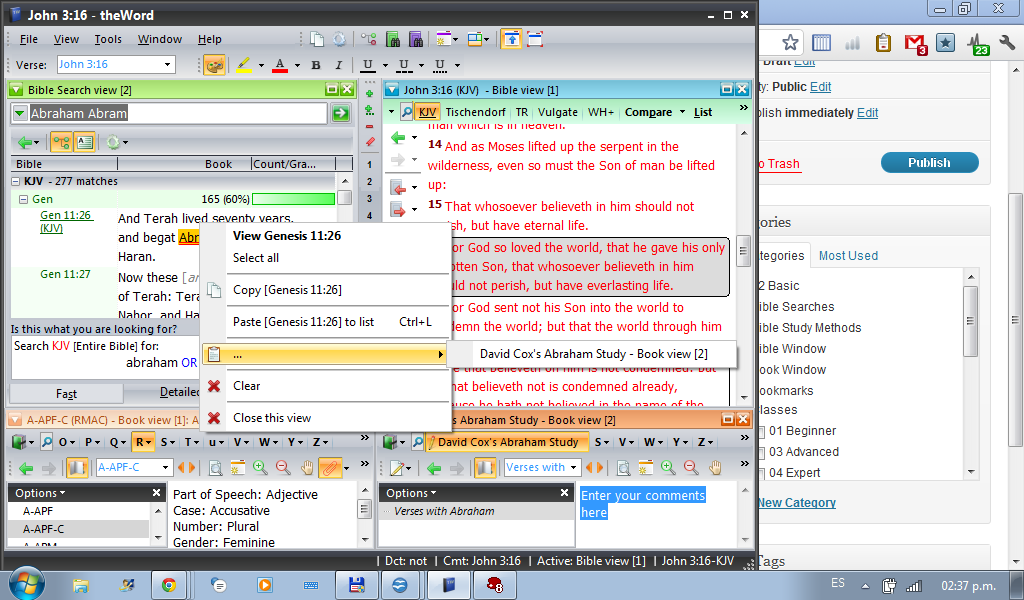 Do you see the option now in the right click window? You can copy the verse directly to your Bible study, (mine would be “David Cox’s Abraham Study”). The paste is going to be where the cursor was last in your BookView module. So you can now search for verses and copy and paste into your own TW notes in a BookView (or Commentary or Dictionary) module. (Also see Method: Verse Collection from Cross References).
More Search Functions…
The last icon on our top row of the Search window is a green lifeguard ring.
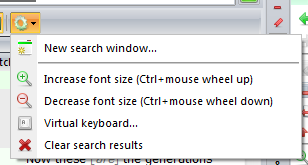 This icon gives you access to increasing and decreasing the font size (same as using the CTRL+mouse wheel if you have that kind of mouse).
Another very important function here is a virtual keyboard. Why do we need a virtual keyboard? Because searching for words in Greek and Hebrew is very difficult if you don’t have a language setup installed in Windows to do that. This allows those who know Greek and Hebrew to quickly type out a word to search in a Greek or Hebrew Bible using this virtual keyboard.
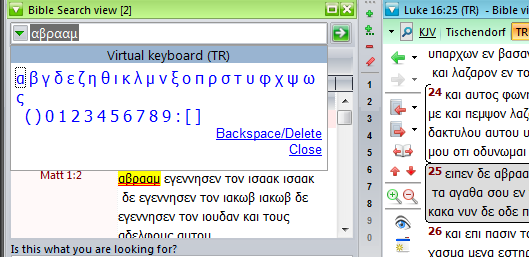 The alphabet that TW will use will be the language of the Bible to search.
Selecting which Bible Version to Search
Well, we missed one important basic thing before we end this class. How do you decide which Bible text (version) you want to search on? There is another icon to the left of where we typed in the search word or phrase, and it is just an arrow.
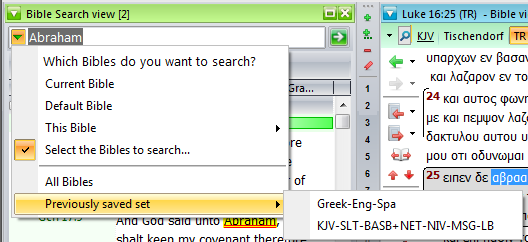 This little green down arrow (to the left of “Abraham” in the above image), will allow you to select your search Bible set. Yes! TheWord searches ACROSS VARIOUS BIBLES if you so want it to do so.
Notice that the settings allow you to specifically select a single Bible version, or you can make a “Bible texts” set to search (See Compare Bible Versions), or all Bibles, the default Bibe, or the Current Bible. This program is simply just wonderful. Extremely powerful, feature rich, and it has so many bells and whistles one doesn’t know where to start.
Bible Versions Available for theWord
TWmodules.com: Bible Versions Bookshelf
Watch these YouTube Tutorials
By Paul Chapman
More Articles from this Category
- theWord Bible Search: How to search the Bible
- Searching a subset of Bibles in theWord
- How to search across theWord Bible Versions
- FAQ: Show/get rid of the “What this you were looking for?”
- Bible Search
- Bible Compare Function
Comments are closed.