Setting the Default Bible Version theWord

Class Objective: How to set the default Bible Version in TW.

Definition: What is the default Bible Version.

TheWord has the ability to use many different Bible versions, and among these are Bibles in English and other foreign languages, specialized Bible versions with Strong’s numbers, footnotes, translator’s notes, cross-reference notes, and a host of other add-ons. Besides that, there exists some TW Bible modules that have more than one translation in them, i.e. Interlineals between Hebrew and English, Greek and English, even the Septuagint and Greek. Besides that, there are Greek and Hebrew Bibles.

With all of these options, there arises a problem. This problem is in certain situations, like when TW has a reference to a Bible in a book or commentary module, which of these Bible versions is the Bible version you want to see? Thus, TW defines a “default Bible version”.

Let me also say that this default Bible version does not have to remain always the same. You can manually change it (via the instructions in this class) so that temporarily some other Bible can be seen by default.

When would you want a different default Bible version?

Personally, I have studied Greek and Hebrew, so I am not unfamiliar with these Bible original languages. Sometimes when I am reading a technical work, most especially a Greek technical commentary, I want to see the Bible references in a Greek Bible. I simply change the default Bible version, and mouseing over a verse reference, I can see the verse in Greek.

Setting the default Bible Version

First of all, you need to click on File then Preferences in the Main TW Menu. In this dialog box, click on the tab “Bible texts“. You should see something like this image.
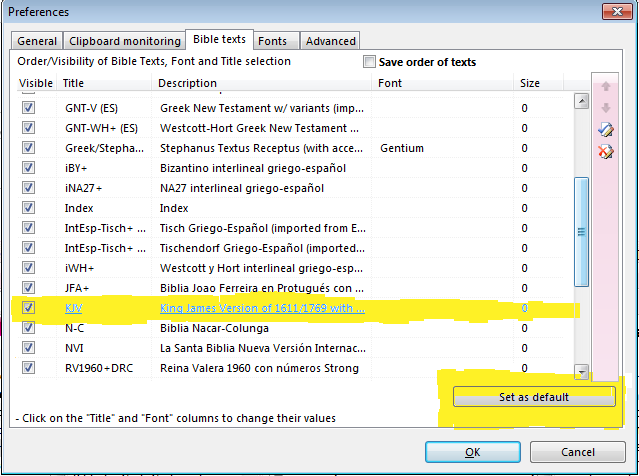
Here I have highlight my default Bible version (KJV). To set it to something else (like Stephanus Greek Bible “Stephanus Textus Receptus” in the image above) you click on the name of the Bible, and then click on the button at bottom (I marked it in yellow) “Set as default”. And that is it!

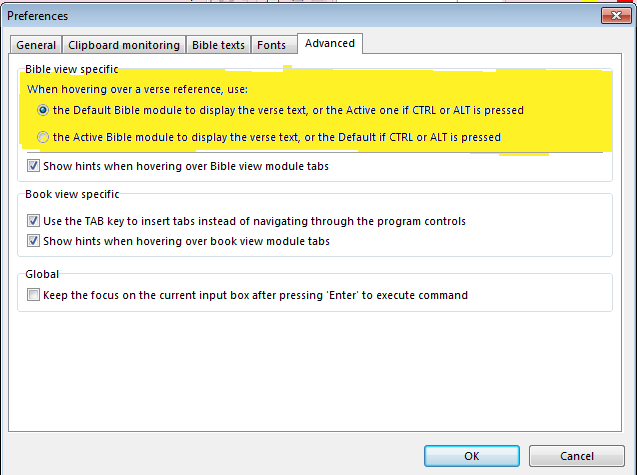
Note that there is one more switch that you will need to check. In the File-> Preferences Main menu option, you need to check the advanced tab, and you should see this image.

The two options at the top (highlighted in yellow) will tell TW to always popup the active Bible version or the default Bible version (set according to this class).


I have a work that I want to convert to… e-Sword, theWord, MySword

Class. converting works from one format to another in the Bible programs, e-Sword, theWord, and MySword.

In this class, we will look at an overview of what can be done as far as converting from one format of these Bible programs to another.

Continue reading I have a work that I want to convert to… e-Sword, theWord, MySword


theWord hyperlink creation in theWord

Class objective: To make an ebook type topic with an outline and notes, page anchors, and with hyperlinks to these anchors/main subtopics.

theWord hyperlink creation

theWord hyperlink creation. There are many ebook applications out there, one of the best and most popular is a simple Adobe Acrobat file (a pdf file). If properly made, a PDF can have an outline, with a table of contents and each point in it being a hyperlink to that section. There are epub books, and a host of other types of software and formats whereby you can make the material of a book or Bible study into a “public document with navigation”. However, the advantage of theWord over all of these, is that theWord automatically formats and links all Bible references into the Bible, and this default Bible can be switched to any particular version you desire. Many people who use the NIV or some other version as well as missionaries make excellent use of reading an English document but using say a Spanish Bible for the verse references. I personally do this a lot. I can copy and paste the verses in Spanish into some sermon or Bible study I am working on.

See also Setting the Default Bible Version


Basically, this is very similar to regular HTML procedures. The way this works is that you first make an anchor somewhere in the page, and then you type text that will be the text of the menu option, and finally to highlight that text and make a hyperlink to the anchor. See my youtube video demostrating this at the bottom of this page.

Making an anchor

The anchor is where TW will go to when you click on the hyperlink, and it is also what will show (starting there to some point further down on the page) in a tooltip when you hover or mouseover the hyperlink.

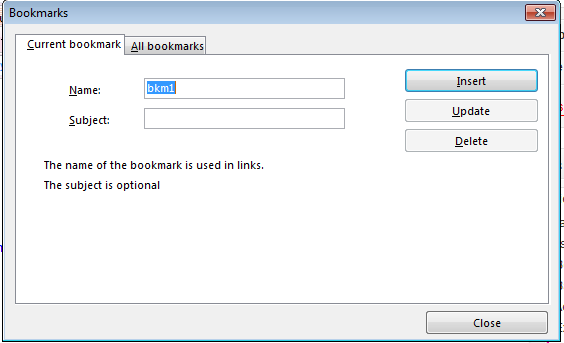
To make an anchor, you go to where you want the hyperlink to end up at, and press Control R. This should get you the following dialog box.


You will type in the name of the anchor (something that clearly identifies it) or you can use the default name TW suggests (which is bkm plus a number). Frankly I reserve the bkm for footnotes myself.

To delete an anchor already made you go to the anchor in the text (a dotted green line or a small round hollow circle identifies it), and press control + R to access it. Then you click delete, or you can change tabs and delete all the existing anchors in that particular topic.


Making the hyperlink

Once you have the anchor (which is always first), then you go to where you want the link text to be, and type in that. In long complicated topics, I often will take all the major headings and copy and paste them to the top portion of the topic, type in “Topics” and below that insert these topics, make the anchors, and then link the text to them. The video shows how this works.

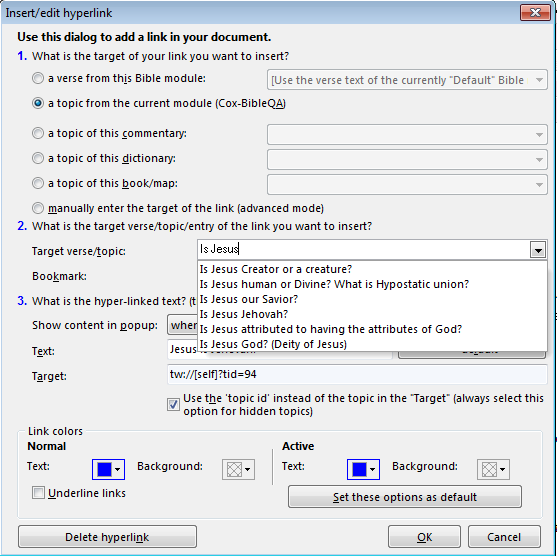
Once you select the text for your hyperlink, you press control K. You should now see this image.

At this point your highlight text will be in the field “Text” (towards the bottom, in the above image is it under the last line of the popup box).  There are two key fields here, the “Target verse/Topic” field and the “Bookmark” field.

In the Target Verse/Topic field you can select a Bible version/verse reference (you will need to change the above options in part 1. to Bible. Here we are leaving the top part and just going to select a topic from the current module. Note that all the topics are in this dropdown box, and you can just click into it and start typing if you know the name of the topic. Since we are not linking outside of the present topic we will leave that alone.

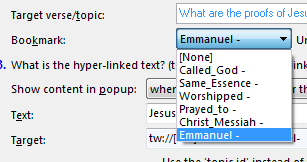
Now click in the Bookmark (anchors) dropdown box. You should see this image.


Here in the bookmark field you can choose which of the anchors on this page you want to make the bookmark or place where TW will go to when you click the hyperlink.

The next field beside it is how much will be seen in the tooltip popup which is displayed when you mouseover or hover over the hyperlink.