Adding theWord Commentary Notes
Class Objective: Show how to make personalized commentary notes in theWord. Adding theWord Commentary Notes
Adding theWord Commentary Notes. First of all, a commentary is simply a module that has the structure of one topic per verse in the Bible. So what we are going to do is to very simply, just make our own commentary. Some limitations of commentaries should be kept in mind. First of all, we should realize that of course you cannot name the topics whatever you want. This kind of freeform naming is for a regular book module. Secondly, you cannot add extra topics as child topic here.
But what are the advantages of a commentary module? First of all, if you have your commentary open in theWord, you can see it as you scroll or jump around in the Bible. It is visible with any Bible version by the way. Also, in theWord, you can insert charts, graphs, and images in commentaries as with any other book module.
Some other observations. When using a commentary, you need to keep in mind the distinction of viewing the commentary in a BibleView window (the commentary is not editable) and in a BookView window (the commentary is fully editable).
If you find yourself wanting to do this, but you don’t want to insert thousands of times to make each entry for an entire Bible, go to theWord.net and download Costas’ dummy (empty) commentary module to help you get started. If you go to the page (above) there are other empty modules to use like a yearly devotional, etc.
tpl.cmt.twm.zip: a template commentary file with an entry for each verse. The entries are used as placeholder
Download the module and unzip it, put it in with your other modules, and restart TW. I would also replace the “tpl” (template) part with your own name, for example for me, I would rename the file to cox-bible-commentary.cmt.twm.
Preparing the Module for Use
The first thing you need to do is to unlock the commentary to make it user-editable. Open TW, accept to add this commentary to your Module Layout set, and then click it in the module selector bar, or type enough of the title-name in the Module Selector search box to get, and select it. It should be showing now. While this dialog box is open, return to the first tab, and edit the tab’s name (how it appears on the Module Selector bar), which is the “Abbreviation” field, the first one.
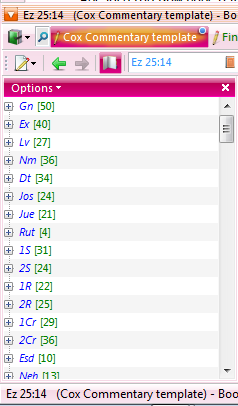
Now you need to right-click on the title (on the letter or folder name where it is in module selector bar if you automatically created the Module Layout by title) , and click on the second tab at the top, and click, “User Module (Can be Edited)“. If you don’t do this step, your blank commentary will not be editable by you and it is worthless.
You should not worry about the green numbers after each book abbreviations. These tell you how many sub-topics are immediately under that particular topic (book name), and if you open one of these (clicking on the plus sign), you will see an equal green number representing the number of verses in each chapter.
Using your Personalized Commentary
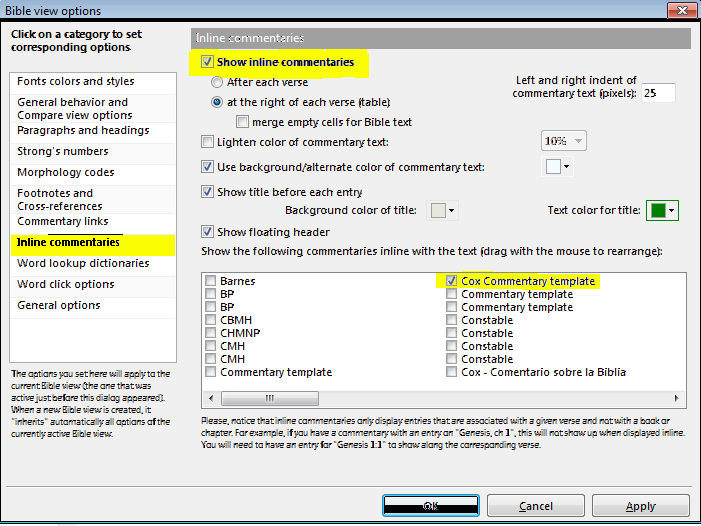
You now need to set up a layout for using it (although this is not absolutely essential, it is a good idea). So in your TW, setup a BibleView window on top (F11) with a Bookview on the bottom (F12). Now click anywhere in the BibleView window, and press Control+O to get to the BibleView Window Options. In the left-hand menu options on this dialog box, find “Inline Commentaries” and put a checkbox at the top of that page, and then find your commentary in the commentary listing part below. In the image below, I named my commentary “Cox Bible Commentary“.
Once you have selected these options you should see something like this.
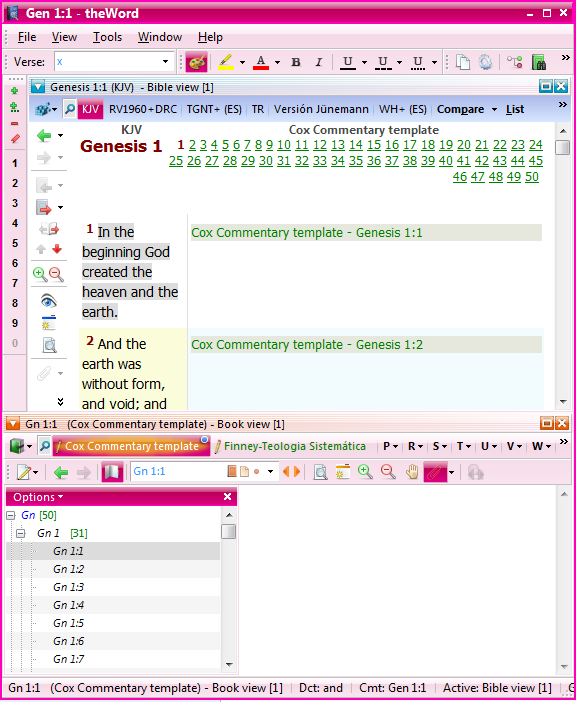
Now we are ready to set up TW for entering comments in your commentary. You may ask, why does David want to go through all this trouble? The issue here is to read a Bible verse and make a comment. I find it extremely helpful to have my personal commentary notes in the BibleView window, clickable, but NOT EDITABLE. This is how I set it up FOR ACTUALLY USING MY COMMENTARY.
On the other hand, sometimes I want to CREATE COMMENTS, and this is where the bottom part comes in. Let me just also suggest that in this layout you add a second BookView Window with the downloaded commentaries you have. So this is the final view of how I am making or creating my comments while reading other people’s commentaries.
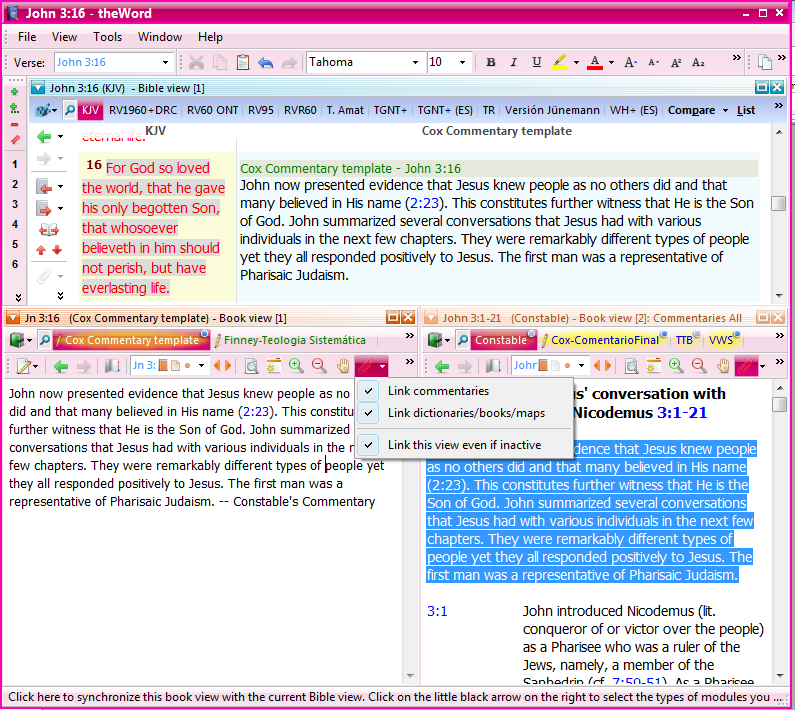
Note that here I have Constable’s commentary in the second BookView window, and I have simply copied part of Constable’s comments into my personal commentary. Notice that there are a few “tweaks” that I have additionally done.
First the icon to the right of the grab icon (hand) I have this opened (click on the down arrow beside it). I have clicked on for all three options. Once you do that, you will need to click the icon (left of the down arrow) and make it “work”. I had to do it several times before it took for some reason. Do the same on the Constable Commentary bookview window. What this does is syncronize these two windows (commentaries only) with the BibleView window, so when you move in the Bible, these two windows will also move to the corresponding verse. This saves you a lot of time in clicking when you comment on more than one verse.
The next thing I did is get rid of the side module index in both commentary windows. This is an open book to the left of the actual commentary verse reference (in the image, “Jn 3:” is showing in this little window).
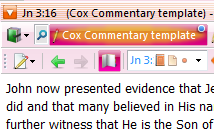
Here you will see the toggle as an open book icon with a red background. Click this on both commentary bookviews so that you will have more space to read and write.
I should also note that in general, I have times when I study through a passage or even a Book, and I want TW to make it easy for me to put notes into commentary pages. This setup is for those occasions. To me as a pastor, the best methodology here is to first read a passage of the Bible, and make my own notes and commentary. Then I start going through some standard and well known commentaries, and see what they have to say, and adding, modifying, or deleting what I said. This is really the way this should go.
Many times I am just doing something else, see a tremendously great comment on a verse, so I open a Bookview window, select my personal commentary, and then go to the verse in question and add the comment. Close my commentary and continue working.
To preach these topics notes if you want, I would suggest using a netBook in the public to view it or a tablet PC, or even an Android phone (See my website myswordmodules.com for some information. Basically you will need to go to the MySword.info website and download the conversion utility for converting TheWord Modules to MySword format. It is not that complicated, but you will need to convert your commentary each time you want to preach it, so a NetBook runing TheWord is nicer and quicker).
Making this setup easy-access
Now that you have TW exactly the way you want it, without a doubt, you have to stop, do something else, and now you will mess up your setup. There are two recommendations here. First you can make a USB installation on your hard drive, and set it up in its own folder, and open that TW instance and setup it up, and do commentary work always from there.
The second (recommended) way is once you get things the way you want, go to the main file menu, select View, Layout, Save Current Layout. (See image below).
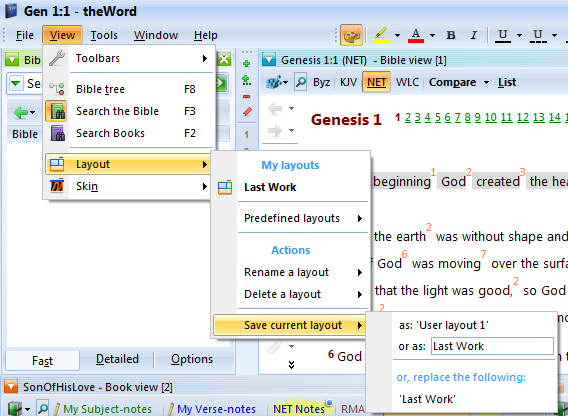
This way you can simply select View, Layouts, My Layouts and choose whatever you named this setup, and get back here quickly. Adding theWord Commentary Notes

