Install TW in Compact Mode
OBJECTIVE: To install theWord onto a USB flash drive.
This post is a branch off of the post,
How to “normally” install TW on a Windows machine
There are times when you want a second “copy” of the program on your hard disk, or you want to install the program onto a USB flash drive, and this post will examine this function, and tell you how to use it.

Have you ever eaten Fried Ice Cream! Donate! It is delicious, like apple pie with vanilla ice cream on top. But you know that you cannot have what is good without somebody paying for it. If you have enjoyed things on my website, please consider helping me out on the expenses and keeping it on the Internet. Can you consider at least a one time donation to this ministry of $10 or $20 dollars? I have a monthly total of about 96 gigabytes total being downloaded monthly from all of my websites. Be a blessing to me and donate any amount. It would be really great if you could gift me and my wife (she wants oa fried ice cream too) this money so that we could enjoy eating out at least once in a while. (I pay the expenses for these sites out of our living expenses.) God will richly bless you and repay you for your generosity. 1 Timothy 5:18 For the scripture saith, Thou shalt not muzzle the ox that treadeth out the corn. And, The labourer is worthy of his reward. If you received some value from my websites, consider at least a small donation. A big donation would really be nice, too, though.
---->>>>Donate to David Cox Ministries.<<<<----
They deep freeze the ice cream ball, and coat it with batter only a few seconds before they deep fry it, and then only fry it for a few seconds.
Making the decision of what kind of install you want
What are the differences in these two types of installations?
Normal Mode Installation
A normal mode installation will install theWord into you computer and operating system as a “normal” Windows program. Note that this means that it will be copied to the standard Windows program directory, which on my Windows 7 Starter, is “C:/Program Files/The Word” and it will set up the Windows Registry with the correct information, and in the Windows Directory, it will point to its’ user data directory to “C:/Program Data/The Word”. All of this is done “normally” or “typically” (behind the scenes) without you having to do anything (just like any Windows program you happen to install). If you click this option, this will install the program “normally” into your computer.
For the majority of the people, this is the way you will want to use theWord. Read on, and if you want to use a USB installation, you can always come back to the theWord exe file you downloaded, and re-run it, and install a USB installation without problems,
Compact (single folder) Installation
At times, you may want to have a second installation of the program installed on your computer. For example, I am a missionary, and I teach and preach in Spanish. So I find literally thousands of theWord modules in English, and only a few hundred in Spanish, and if I had them all mixed together, I would have a hard time finding the Spanish modules. (Note: A “module” is a file you make or download from the Internet which is essentially “a book” which you use with theWord program, and for example, it can be the KJV Bible module which is automatically included in the program, a commentary like Barnes Commentary, a dictionary-like ISBE, International Standard Bible Encyclopedia, or just a religious reference book, like one of Edersheims works, like “The Life and Times of Jesus the Messiah”. All of these are modules, which are separate from the program, and you download these modules and install them into the theWord program so that you can see them and search on them from within TheWord.)
The main difference between a Compact mode installation and a “Normal” installation is that in the Compact mode install, theWord doesn’t install anything “important” into Windows. (By important, theWord may create or use some files in temporary folders like indexing files, but these are not essential to running the program, and if they are lost, the program will just create them anew on the fly as it needs to.) A normal program is going to be installed into the normal Windows program folders (mentioned above), and it will have registries in the Windows Registry to “find the program” and make a standard Windows shortcut on your desktop. In the Start button listing of programs, it will appear. None of this will be done in a compact mode installation.
Why would this be a benefit?
Simply put, a compact mode installation is a little more work. But the benefit is much greater. When you have a typical Windows installation, and you do a backup, you must search all over for your programs, and only cross your fingers and hope that you got everything and reinstalling the program will restore things to “the way they were.” If this is your fear, do a Compact installation, and burn a backup CD with just the Compact mode folder, and you will have everything exactly the way it was when you did the copy-burn of a backup. (Also you can just copy the entire folder over to a USB Flash memory drive, or external hard disk and it works the same way.)
When you run theWord from a Compact Mode folder, everything that Windows needs for the program to run is directly in that folder, and not spread out all over your hard disk in a dozen folders.
There are two benefits here: 1) If you want a second or more instance of the program for other purposes on your hard disk, this is the way to do it, or 2) if you want to install the program onto a USB flash memory drive, and carry the program around with you, this is also the way to do this.
Note: In the dialog box above, you will see an additional checkbox (USB flash drive mode) which will be a completely “clean” installation without any references elsewhere on your computer to the program.
Installing to a Harddisk Folder
As mentioned above, a compact installation to a folder on the hard disk will include some Windows shortcuts to the program on the desktop, and a few other things, but basically, all the essential files will be in that singular folder on your hard.
Installing to a USB Flash Drive
This is an excellent option for installing theWord onto a flash drive. If after you use the program and like it, you can make a Compact installation on a USB Flash drive, copy all your modules onto it, and then show the program live to other people (like your pastor, your Sunday School teacher, missionaries, etc). They can just copy the files from the flash drive onto their computer, and “they have what you have.” This is an excellent gift for other people.
As a personal suggestion, I would not purchase less than a 1 GB flash drive. Actually the available modules out there (as of summer 2012) there are easily 2GB or 3GB of free TW modules available, so even if you don’t need each and every one of them, it would be good to have a lot of space for the future. A USB flash drive probably will last a couple of years before it begins to fail. I have 2 in my office that are now no good, so they do fail. Remember that. It takes very little effort to copy one of these things onto a CD or DVD and have a more permanent copy and backup of your files.
Continuing the Installation
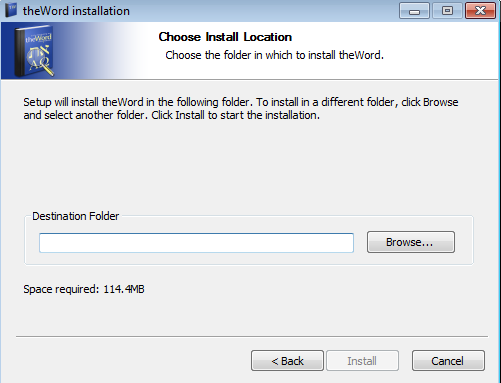
If you install into a folder on your hard disk, you will need to supply the name of the folder for the installer to make. You should be presented with this dialog box (below)…
 From here you choose “Browse” and select an existing folder (selecting a folder with a Compact TheWord installation already there will up those files) or choose an existing folder. In the standard Windows dialog box that pops, you can also create a new folder (button at bottom of that window).
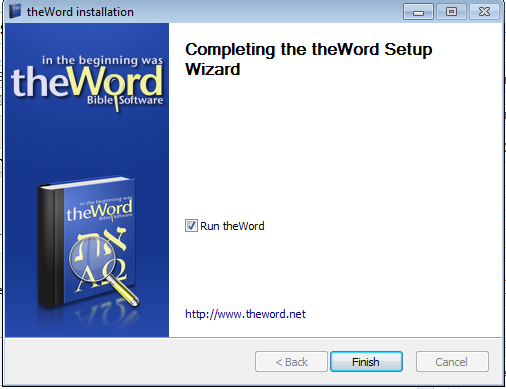
The next and final dialog box is an optional “Run theWord (now).”
More Articles from this Category
- Where does TW keep its files?
- What Operating System does TheWord require?
- Tips and Tricks
- theWord required hardware
- theWord Bible Software (1 of 4): Downloading and Installing
- Specialized theWord Study Area

