
In this class, I am going to walk you through how I make a theWord module very fast. If you just take a minute and do this with a module, you will find it is very simple to make new modules from pages on the Internet.
Please read this page first, Deciding on a Work to Create.
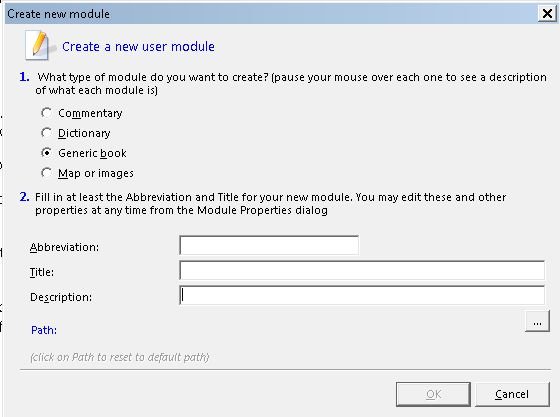
Name your Module
The first thing to do in module creation (after the above considerations in Deciding on a Work to Create.) is to make a new module. You do this by going to theWord, and File->New User Module on the Main Menu bar.
Next, you need to figure out what kind of module you are going to create. Simple, a Bible (you need to be working in a Word Processor, not theWord), a dictionary (you have a list of words with something about each one), a commentary (your material is organized by Book of the Bible, Chapter, and Verse (optional by verse), or just a normal book (GBK).
A few notes here…
First of all, you can come back and fill in or change any of this material later on EXCEPT the module type (#1), and the “Title”. The title is the name of actual Windows file, so you need to put something in there, and for #1, you need to decide correctly before you actually do anything else. The only other option of deciding wrong on #1 is to delete what you have created and start a new module, i.e. start over. No good.
Secondly, the Abbreviation is just that, a shortened form of the title so that your users don’t have their entire module selector bar taken up by one or two titles. Go for short. Leave the description to later when you get a feel for the book.
Before you leave this screen (we are working on being fast here), select the Title line and copy it to the Windows clipboard.
Press “Ok” (note: Since tw is waiting on creating a physical file, and it is waiting on you to put something in the “Title” field, the “Ok” button will not become active until you fill in something in the “Title” field.
Create Chapter 1
In all of my modules I like having a single chapter with the Book’s title, author, and Table of contents. You can name this “Contents”, but if you ever search using tw, a chapter title named “Contents” tells you nothing about the book, so I name this chapter the same thing as the “Title” field (the actual filename of the file).
Press Control+N to create a new chapter or Topic and press Control+V to insert your book title.
Start with a table of Contents
There can be a lot of variety in the types of works you will import into theWord, so on some of them, this procedure won’t work, but for most normal books, it works great.
I am assuming that you have either a webpage or an RTF file with the books contents. If you have a PDF, no good. You can click on the PDF and control+A to select all, and you might get all of the PDF, you might not. PDFs are like saying that the work is in a file. It can vary so extremely that you really are not describing what format it is in by saying it is PDF. PDFs were made as an intermediate format between programs and printers, so they are postscript language, or in other words, pdfs are in printers language. Every pdf will print to about every printer on the planet. That is all that you are saying by saying it is in PDF.
So go to http://pdf2doc.com/ and hopefully you can convert it to an RTF to work with.
Scan your HTML or RTF looking for the table of contents. Try to grab the book title, author, and table of contents and copy them to the Windows clipboard. Now paste it into your theWord module in the title chapter. Look carefully at it. Here I like to get right of “Chapter 1”, “Chapter 2”, etc. and reduce that to just 1., 2., 3., etc. Space is at a premium in theWord topic list box, so anything like that takes up space from the title. For example, one I saw was like this.
001 Chapter – 01: blah, blah, blah
002 Chapter – 02: blah, blah, blah
003 Chapter – 03: blah, blah, blah
Most people are seeing 20 characters in a Bookview setup with other mini-windows also., so they are only seeing “bl”
1. blah, blah, blah
2. blah, blah, blah
3. blah, blah, blah
If you format all your chapters like this, then a typical setup will now see “1. blah, blah, blah,”
It is not much difference, but it is enough to understand which chapter is which without too much playing around with the interface.
So edit the table of contents so that it is good for using for actual chapter/topic titles.
In one work on the English church, each chapter was like 150 words long. Horrible to try to figure out what was what. Avoid this if possible, but I would go with the original chapter titles almost always. Even the English Church book, I just abbreviated the titles at some convenient point so that it wouldn’t run on forever. If you want to keep the “Chapter 1” etc stuff, copy the entire table of contents to your Word Processor and work on it there, keeping the actual text in your book as it was originally.
Gather your text
Either you have all of your chapters together in one place (like an RTF of the book) or they are spread out in several files, like HTML files. It doesn’t matter. If you are using an RTF with everything together, select and copy all of the chapters, and paste it into your module in the title chapter under the stuff you pasted there before.
Format your Book
It is very important that you do not copy and paste chapter by chapter into individual topics in the tw module. You want it all in the same place first. This is because most tw modules are horribly formatted, and this looks bad, and multiply it by 50 or 100, and that is what is getting put out into the community.
If you have everything in one place (your title topic in your module), you can select all (control+A), and you can format. According to Costas Stergiou, the program’s creator, he has made the program to be seen best in Tahoma 11. That is his recommendation so click on Tahoma 11. Note that if you do this with everything together now, you do it once. If you copy and paste into individual topics, say for a book with 35 topics, you will have to do the same thing 35 times. No good. Think and plan a little and it can go a long way towards being more productive.
Secondly, you want to set your margins. Here select all again (control+A) and right-click in the text and click on Paragraph which should bring you up a dialog box like this.
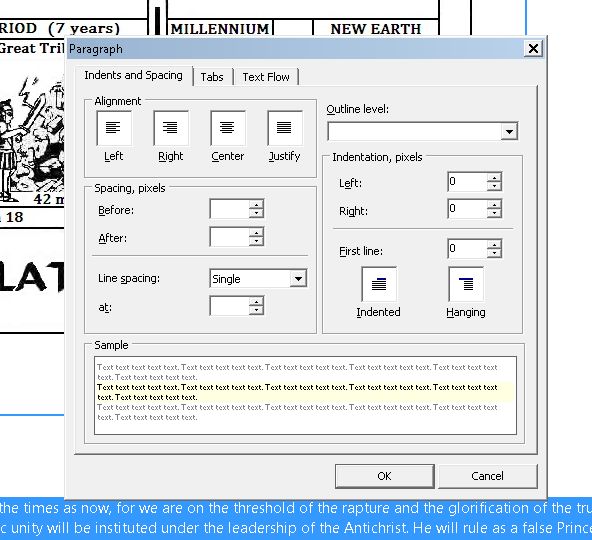 The important items here are
Spacing Before: 0
Spacing After: 7
Line Spacing: Single
Indentation
Left: 7
Right: 0
This will provide a slight left-hand margin so that your text will not run up against the margin, and it will give some space between your paragraphs. That is a norm, which I try for each module, some modules might be a little different.
Notice that in the image, the Spacing boxes are empty while the Indentation boxes aren’t. In the selection I have, the spacing before and after both have more than one setting in the text as imported. All of the paragraphs have the same indentation.
This is a one-stop place to set everything.
Now take a minute to scroll through your text and check for anomalies. Here sometimes I find a paragraph that has a button or number but from where it came from, it had a negative number, and it is off the screen on the left-hand side. Buttons, click the button icon on theWord menu bar twice to set it to a button then the second click removes the button attribute. Numbers work the same.
Create the Topics/Chapters
As you can tell, I am assuming a “Topic” (name in theWord) and a “Chapter” as being synonymous. I consider the actual first topic in a module as the table of Contents topic, and the next topic is the “first chapter” and I number the first chapter with a 1. I do not number the table of contents with a one. Just a personal decision I made.
Once you have your text ready to go, now we need to create the chapter structure in a quick manner. I have used various macro programs and other things, but nothing works as fast as my own fingers. If you just do this for a couple of 5-6 books, you will be sold on it too.
Select the entire table of contents, making sure that your first chapter is on the first line.
Now we are going to do the repetitive motion here of creating by hand x number of chapters. Don’t get scared at doing this by hand. Other things work too, but you will spend endless hours trying to make it work and keeping it working, and there are always exceptions that you will have to give up and come back to this method again.
Control+N makes a new chapter in theWord. At this point, you should only have 1 chapter, the title chapter. Pressing Control+N gets you this screen.
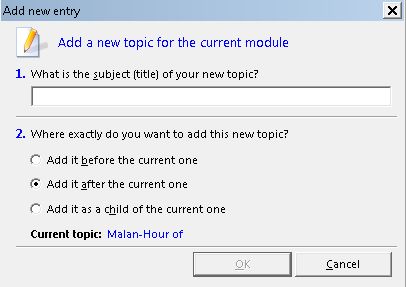
Note again that the “Ok” button at the bottom is deactivated until you type at least 1 chapter in the #1 field.
First of all, make sure that #2 is set on “Add it after the current one”.
Now press control+V, which will insert your clipboard text into the box.
Notice something strange? Yes, it only copied the first line until the paragraph mark.
That is good. It truncated (cut it off) the rest. As you press enter, tw will make the new topic/chapter and throw you into the editing side to edit the actual topic. Press Control V again. Now, believe me, this is the easiest way to do it. Jump down one line to the beginning of line, and then press Shift+Control+End. This should select you down to the end of topic. Control+X to copy it into the clipboard.
Now you press control+N again and repeat until you have run through the entire table of contents.
Note: In some table of contents, there is an extra line feed between each chapter. I usually edit these out in the step of editing the table of contents. But if you still have them, don’t worry about it. Don’t touch them, but leave them in. Instead of going down 1 line, go down to the next chapter instead, and you will work around that peculiar situation as if it didn’t exist.
Populate your chapters
Now we go back to the first topic/chapter that should contain the entire work. All you do now in down arrow until you find the first chapter. Place the cursor in front of the first letter of the first chapter and Shift+Control+End to go to the end of the selection. Now Control+X to paste it into the clipboard.
Shift+Tab to get back to the Topics list, Down arrow once, and tab. At this point, you need to decide if you like having the topic’s title at the top of that chapter or did the original work’s title look better? I usually go with the original work’s title. So Control+A to select all, and Control+V to paste over what was in the topic before.
On the other hand, you want to keep the topic’s title, down arrow and control+V and both ways you have your chapter 1 inserted. Scroll down until you find Chapter 2, and do likewise until you run through all the chapters.
Spiff up your module
There are two other things that you can do to make your module really great, and that is to make hyperlinks of the table of contents and hyperlink the footnotes.
If you go to the table of contents chapter, and select chapter 1 (not the title chapter), you can select chapter 1, and then click the globe on the menu bar or press Control+K and you should see this dialog box.
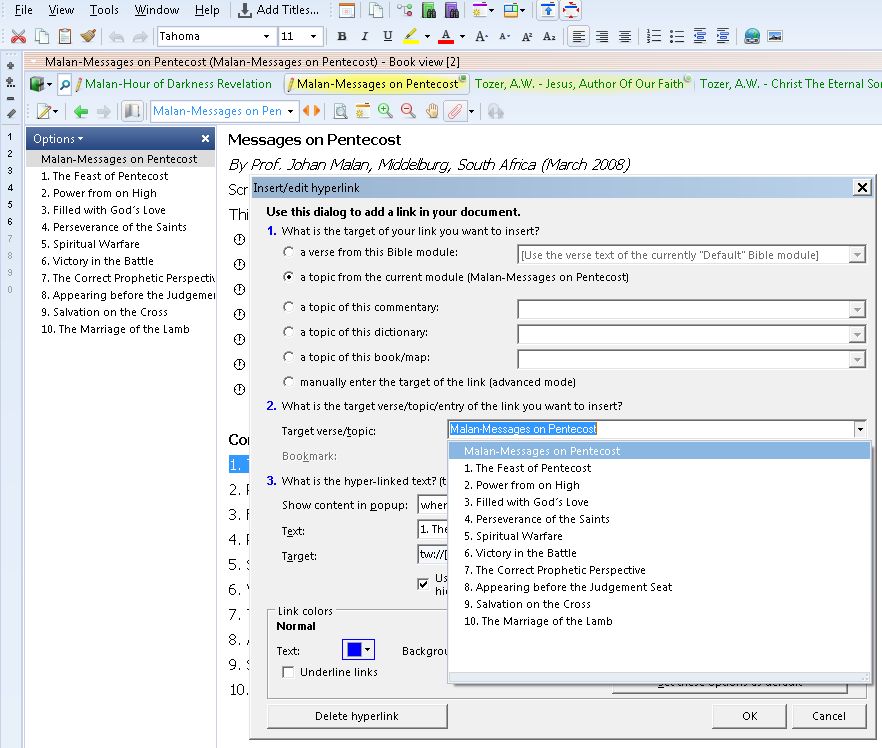
Notice that in #1 you set it to the second option, to link within the same module.
Now also note that in #2, if you click in the “Target verse/Topic“, you will now see the topics in your module.
Here you can set the hyperlink to go to the corresponding chapter, and enter or “ok”, and it is set.
Why?
This allows a person to go to the table of contents and read the entire module from popups by mousing over the topics.
I doubt that anybody would read it this way, but you can quickly see what is in a chapter and read the first so many words, and Shift+Down Arrow to scroll that popup box. It is very handy. It is just an extra.
Footnotes
Let me say that footnoting a module is a laborious task. I have seen modules with 100’s of chapters, and some of them have over 1000 footnotes in a single chapter. I am not going to footnote something like that without somebody paying me.
But in some works, the footnoting is more necessary especially when there are verses or Greek or Hebrew words in the footnotes.
You make footnotes very similar to the hyperlinks
First, decide if you even want to do it.
Check out the scope of the task. If a work has 70 footnotes, it is manageable. As the number grows over 100-200, probably forget it. Don’t waste your time,
Setting Module Properties
Part of making a module is making it the way it should be. So you need to understand a module’s properties, and what you need to do to “finish it off”, and make it prepared for distribution.
Right-click on the module’s name in the Module selector bar (this is the bar where the modules in your tw show up. If you are editing it, it should appear ALWAYS in the bar.
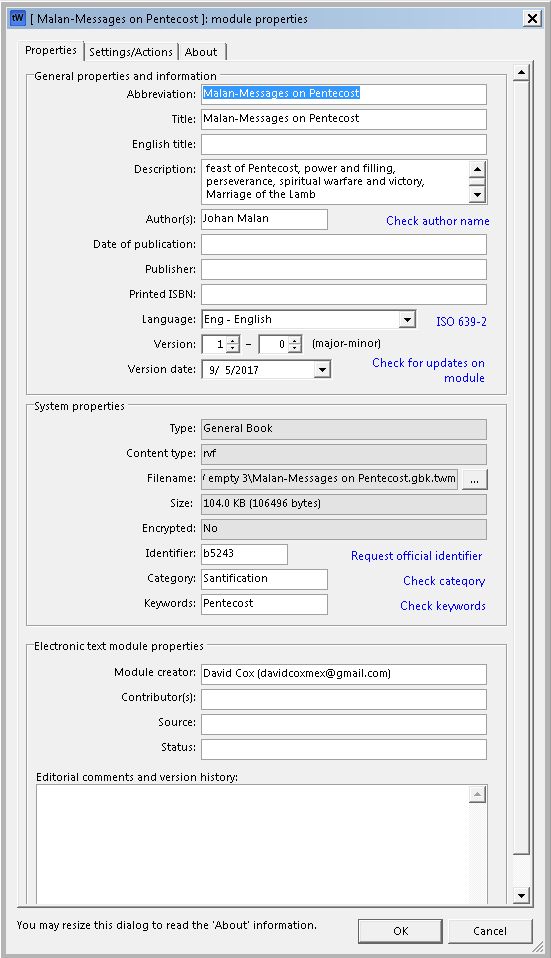
Now we can change the things we first mentioned in the Name your Module at the top of this post.
The abbreviation should be short, but understandable for the work. I left this one as is.
English Title: Note that this is not necessary to fill in unless it is in some other language than English. If it is, please put an English translation of your title here if you can. This greatly helps other people who see your module to know what to do with it. Think of somebody like me with a theWord modules website that comes across your module and want to upload it, but if it is Pilgrim’s Progress is Swahili, then I would go with it. But if I don’t have a clue, I will leave it alone.
Now fill in the Description: and the Author:.
It is very important that you also put in the correct language (just click on the “Language:” box and down arrow to see all available languages and abbreviations). Also, put the version number. The first creation of a module, the major should be set to 1, and the minor left at 0.
The grayed out blocks are information that theWord “knows” about the module, and are not editable. But the TW module Identifier is important. Why? By default, it uses the filename of the module. But Costas (theWord’s creator) assigns and gives for free to people creating modules a set of TW module Identifier numbers. I have a large set that he has given me, and if you ask him or me for a number, we would be glad to give one to you.
Why is a TW module Identifier important?
There is an inter-module linking ability that theWord has. When somebody in another module links to your module, the links won’t work if the target module doesn’t have a TW identifier. When you set an identifier, then it will work. People can write and link to your module if your module has an identifier.
Category: is the broad group to which the module pertains, and Keywords are keywords that are specific to the module.
Module Creator. You should always put your name on the modules you create. You should also add your email address so that people can get in touch with you if they have questions, compliments, or if they see errors in it. One time my source didn’t have the final chapter, and somebody sent me an email about it, and I search for it on the Internet, and found out that they were right, so I added the last chapter.
See more Module Creation Posts
- Converting from other Module Formats
- Converting an Image PDF to theWord Format
- Commentary Module Creation
- Bible Reading Plans
- Benefits and Disadvantages of Compressing a theWord Module
- 07 Module Creation Upper Case to Lower Case
- 06 Touch Typing Help for Module Creation #1