theWord Bible Bookmarks
Class Objective: The student should be able to set a bookmark, delete it, return to a passage using the bookmark, etc.
Introduction
theWord has a wonderful feature called “Bookmarks”, in which places (specific Scripture verse) is set as a bookmark, and which you can quickly jump to it when you go off somewhere else. The way this works is that it is a narrow strip to the left of the Bible window with the numbers 0 through 9.
This feature is used when you are studying perhaps one passage, and you want to chance down something else, and you will move the BibleView Window to some other passage. You will study out the matter, and then want to return back to where you are when you began your “rabbit trail”. Before leaving, set a bookmark so that you can get back quickly.
Step 1. Showing the Bookmarks Menu: Show the Bookmarks menu strip. This is toggled on and off by the main menu,
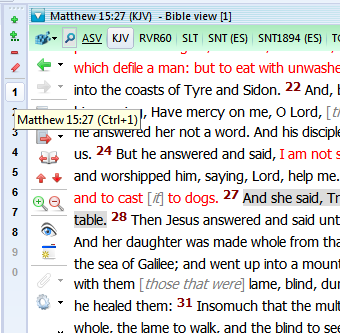
View -> Toolbars -> Bookmarks. What you should see now is the vertical menu to the left of the Bible like in the image below.

Dagg Manual of Theology (and links to this work in various other formats).
Dagg Manual of Theology (MySword for Android)
Dagg Manual of Theology (theWord Bible Format)
Dagg Manual of Theology (esword format)
Dagg Manual of Theology (PDF Format)
2. Setting a bookmark. To set a bookmark, first, go in the Bible Window to the passage you want to see (and set the bookmark at), and then look at the bookmark strip to the left. I have bookmarks number 9 and 0 empty, so I would press Ctrl+Shift+9 or Ctrl+Shift+0 to put the new bookmark in one of those. At the top of the Bookmark strip, there is a big green plus sign “+” which you click on to add the current passage to the next available (empty bookmark) spot. This is also done by pressing Shift+Ctrl+B.
The icon below that will allow you to click to add a bookmark to a specific slot or bookmark (1 through 9 and 0).
3. Seeing a bookmark. In the image at left, I moved the cursor over the number 1, and it was set to Matthew 15:27. So the popup tells me what verse the Bookmark is set to.
4. Going to a bookmark. This is done by 1) clicking on that little number in the Bookmarks strip or by pressing Ctrl+1 to go to the number 1 bookmark, Ctrl+2 to go to the number 2 bookmark, etc.
5. Erasing all bookmarks. These bookmarks are simply temporary markers. You will want to use them frequently and probably erase them often. To do this quickly, there is an icon on the menu, which by clicking, you will erase all the Bookmarks.
 Notice carefully that this is a minus sign, not the slanted red minus sign under it.
Before deleting all, TW will ask you for permission to delete all.
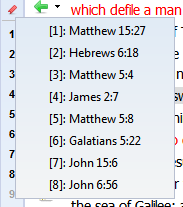
6. Selectively going to a specific Bookmark. Apart from mousing over the 1 through 9/0 to see what each bookmark is set at, you can click on the red slanted minus sign, and see the entire list of bookmarks and verses, and select one and go to it. Note that you must click on the icon to see and select.
 Here we see my book marks complete with verse reference, and I just click on any on, or Ctrl+[number 0-9] to go to it.
A final note: This bookmark service is only for Bibles.


