Commentary Module Creation
By David Cox
OBJECTIVE: In this class we will go through the simple steps for creating a new commentary module. For purposes of this class, we will not discuss copyrights which is also a very important topic.

Buy me Steak Taco! You know, I work hard at my websites trying to provide you with good material that is sound doctrinally-speaking and of interest to God's people. It is hard work, but I don't mind doing it, and I feel called to the ministry, and God will bless me after all is said and done. But in the meantime, I do need to cover my expenses. I have a total of 34 websites (half English and half Spanish), and each one costs about $10 per month to keep up. That does not take into consideration my time and effort in writing content. Won't you consider at least a one time donation to this ministry of $10 or $20 dollars? It would be really great if you could gift me and my wife this money so that we could enjoy eating out at least once in a while. (I pay the expenses for these sites out of our living expenses.) God will richly bless you and repay you for your generosity. 1 Timothy 5:18 For the scripture saith, Thou shalt not muzzle the ox that treadeth out the corn. And, The labourer is worthy of his reward. If you received some value from my websites, consider at lest a small donation. A big donation would really be nice, too though.
Donate to David Cox Ministries.
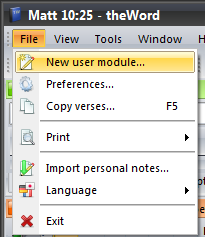
To begin with, select from the menu, File-> New User Module.
Now we need to select what kind of module we want to make.
Commentary Module – The format of this module is that each topic (chapter) in the module will correspond to a specific book, chapter, or verse in the Bible. There are no tree hierarchies in this module type except the book of the Bible, chapters, and verses.
Dictionary Module – This is a module type that has no hierarchies at all, and the entire set of topics are entries in a dictionary. The good thing about this module type is that if the titles of the topics (chapters) are Bible words, it can be used as a Bible Dictionary with the Bible Word Lookup function.
General Book Module – This is the most “free form” module type, and it can have tree structure as involved and deep as you want. This module type is identified by “GBK” General BooK module.
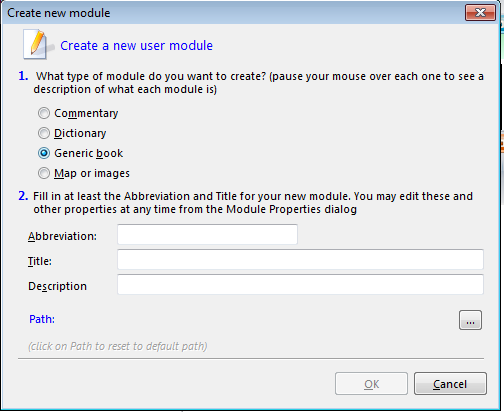 So in this class, we will want to select the Commentary Module option. This will create a blank commentary module, which will only accept a valid Bible reference for a topic.
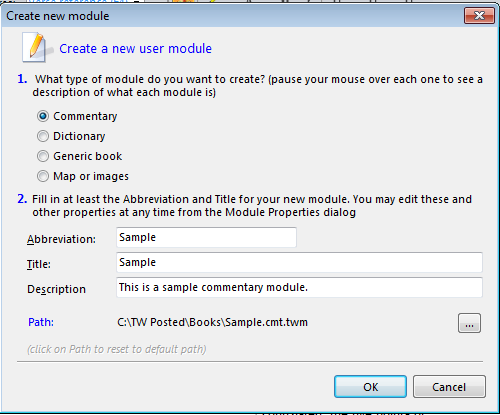 As you can see here I filled in the Abbreviation (which will appear in various places within the program, mostly in the selector bar so that you can identify it). It is best to keep the abbreviation down to 5 letters or less if you can.
The title and description are what will show when you mouseover the abbreviation, and at this point, the title will be used for the module’s Windows filename. As a side note, it is better to not have spaces, and not use capitals if there is any possibility that the module will be posted on the Internet. For example, “matthew-henry-commentary-on-the-whole-bible.cmt.twm”. You can later change the title from within the program (which will not at that point change the filename). For most normal use, you can use regular title names, like “Matthew Henry Commentary on the Whole Bible”. TW will put the cmt and twm extensions on the filename for you.
Now when you press enter, TW will prompt you if you want it to add it to the current module layout (See How to Make Module Sets), so click yes.
At this point, you have a blank module with no topics (chapters). In TW we use the term “Topic” because it can be a single dictionary entry, a chapter, or a verse commentary. So I will use “Topic” from here on.
We want to begin making a new verse, let’s say Genesis 1:1.
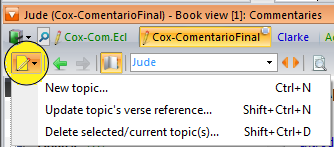
Here you click on the icon in the far left corner (I colored it yellow for you to see it better). This will give you the opportunity to create a new one, change (“Update”) the existing one the cursor is on, or delete the one the cursor is on.
An alternative is to press Control + N to get a new topic dialog box, and if you have made other modules, you will notice that the new topic dialog box is different.
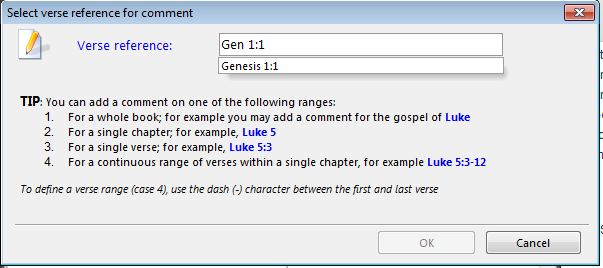
The first thing to notice is that TW will only accept a valid Bible verse reference. Below what you type in “Verse Reference”, it will interpret what it understands from the abbreviation. I typed “Gen 1:1”, and puts the full book name, so you don’t have to. Next note that you are not limited to just Bible verses, but you can also make an entry with notes for chapters and entire books. For example, you can make a topic named “Luke” and enter in notes on the book of Luke. In some places within TW, you might not be able to see those notes, because on a verse to verse correspondence to a Bible window, it is not possible to see these notes. But in just viewing the commentary, you can.
Note: For those who are using TW in a non-English language, if you have changed the TW interface into that language, then you can use that language’s Bible book abbreviations. For example, I write things in Spanish, so in my Spanish commentary, I change the TW interface to Spanish, and from there when I type “Stg 1:1” for Santiago 1:1 (James 1:1), TW will automatically know the correct Bible book reference.
Tree Versus List
Note that TW has two “modes” of viewing the topics (in commentaries and other types of modules), which are list mode, and tree mode (tree mode is not available in dictionaries because there are no hierarchies).
A list mode is each topic listed basically in a linear fashion. A tree mode takes a collapsible format where one “node” in the list can be above, under, or equal with other nodes. In a commentary, this is very useful.
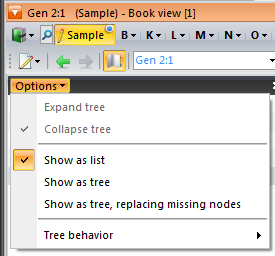 Notice in this image (you get this drop down dialog box by clicking on the word “Options”) that our sample commentary is in list mode, so node and tree view is disabled. To enable tree view, you click on “Show as tree”.
Here I “populated” our commentary with some verses and chapters from Genesis, and also made a book topic for the entire Genesis book.
Before we move on, notice the “Show as a tree, replacing missing nodes”. A node is a single entry in the tree, and as such Genesis is a node, Genesis 1 is a node, and Genesis 1:1 is a node. This would populate the entire Bible with all chapters and verses (in the blank) for you.
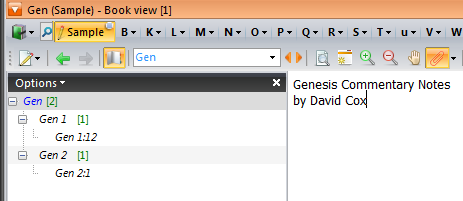
Here we see our small commentary on Genesis starting to take form. Notice that the cursor is on “Gen [2]” in the left-hand topic pane and that in the right-hand notes pane, I typed at the beginning of my Genesis book notes.
Also, note that this left-hand topics pane is a standard Windows tree. You click on the minus sign before the node to collapse it, and on the plus to expand it, and click on “Options” again to collapse all or expand all.
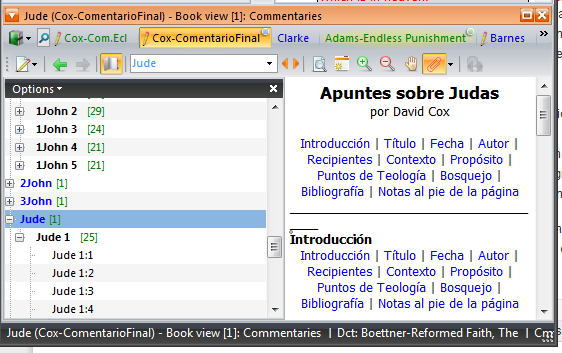 In my commentary in Spanish, I have fully populated it with nodes (most blank). (Note that the Books are in English because I had TW in English language interface at the moment. These would change to Spanish if I changed the language interface.) Here you can see where you can very easily expand and collapse the tree nodes to find places in a book of the Bible.
See more Module Creation Posts
- Preparing material for a theWord Module
- Module Fast Production
- Module Creation Topic Names
- Module Creation of Topics Introductory Material
- Module Creation File Naming Convention
- Making HyperLinks theWord endnotes
- Making HyperLinks theWord Bible verse References
