theWord Bible Bookmarks
Class Objective: The student should be able to set a bookmark, delete it, return to a passage using the bookmark, etc. Continue reading theWord Bible Bookmarks
Class Objective: The student should be able to set a bookmark, delete it, return to a passage using the bookmark, etc. Continue reading theWord Bible Bookmarks
Using theWord Commentary Links is a tutorial post on how to see and use commentary links (popups with the text for the verse).
Class Objective: To study through a portion of Scripture in the BibleView Window, using commentary links popups to lookup various commentaries on specific verses.
This tip is given to help you hone your theWord skills.
SITUATION: Let’s say you are writing something within theWord (in a BookView Window). You want to insert a verse. Where is that verse that says you should worship only God? Well, you remember part of it, that it is in Matthew 4 in the temptation of Jesus in the desert, but you don’t remember exactly where it is. Continue reading Quick Finding a verse
Class Objective: To teach the user how to get information from TW into other programs.
Okay, so you are now using theWord regularly and you like the ability that it has to search the Bible and other books. But you want to use it to insert Bible verses into your emails, you Powerpoint presentation, or just into your favorite word processor, (no not Microsoft Word, that would be easy, but AbiWord, a fantastic little Microsoft Word knock off that is freeware and just great!). How do I do that?
theWord has a nifty function to help the user insert verses into any application that can take user input. This feature can also be a user with HTML pages on the Internet to just see what the text of a verse or verses is.
The way this works is that theWord has to be running, and after it is running in another window, you go to your other application, type in a Bible reference, highlight it and copy it, and TW will popup the verse, and you can optionally just view the verse references you highlighted and copied to the clipboard, or you can paste them into your other application.
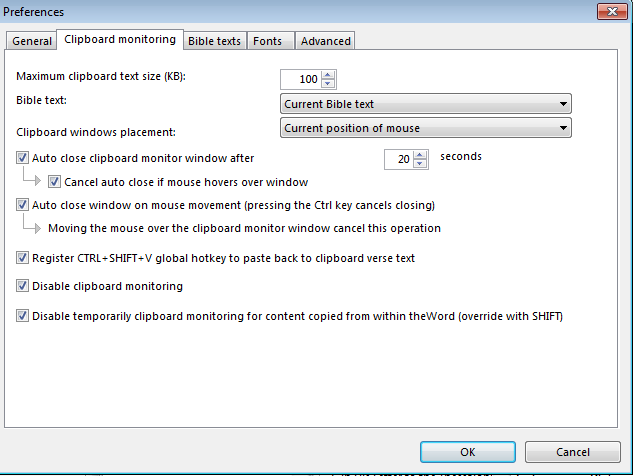
This feature of TW has to be activated before it works. To turn it “on” or “off” you go to the TW main menu and click the File menu option, then Preferences. This will give you the following image (note you have to click on the second tab to see what is in the image below).
 Watching the Clipboard Options). Just unclick the second to the last option (“Disable clipboard monitoring”). Now notice above that, with Ctrl+Shift+V you can globally (in other programs) insert verses into any application even though it isn’t specifically designed to work with theWord, for example, Microsoft Excel, a database program, an email program, etc.
Click ok and close the window.
Now we are going to use Microsoft Word (any app will work, it is just what I decided to use for the demo). Alt+Tab to your other program, but leave TW running in the background.
Type in a verse reference, highlight it and then press Ctrl+C (standard Windows shortcut key for copying text to the Windows Clipboard).
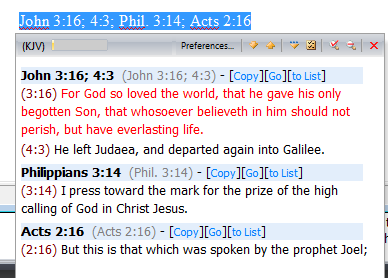
I typed “John 3:16; 4:3; Phil. 3:14; Acts 2:16” highighted it and Ctrl+C.
 Okay, you did this just now and it didn’t work. Did you first go to File-> Preferences, and uncheck the “disable watching the clipboard” checkbox?
Let’s point out a few things about the above image. First of all, notice that it has three verses from different books, and John 3:16 followed by John 4:3. This is a fantastic way to lookup verses quickly in Internet webpages, just highlight, and Ctrl+C, and see the verses. Your option here are to copy the verse to the clipboard, go to the verse in the Bibleview window, or to copy it to a Bible Verse List (See Bible Verse List Feature for a class on the Verse List feature).
Now, depending on how much you have played around with this function (and possibly changed things) you should be able to first select and then copy the reference into the clipboard, (see the above popup), and then if you haven’t changed things, you can press “Control+Shift+V” and TW will remove the Bible reference (first book’s set of references) from the clipboard and replace it with the verses written out.
Note that the format is whatever is set with the Copy Verses option (F5 from within the TW program), so TW gives you a lot of flexibility to change the format of what you are inserting.
The good thing about this is if you are a pastor or a Sunday School teacher, and you are working on a sermon or study, you set TW to watch the clipboard, and you can just type in references into any program you are using, and with selecting, copying (Ctrl+C), and then (Ctrl+Shift+V) you can insert those references into your notes. Note that this works with references all in the same book of the Bible, and it will only insert the references from first book of the Bible in your selection of references.
TIP: How do I stop Windows from switching to my “other application” back to theWord every time I click (copy verse) in the verse popup dialog box?
Keep theWord minimized. (Comment from Costas Stergiou).
By David Cox
Bibleview Changing the Bible Font in theWord is a tutorial page for theWord in which I go through how to change the font of a Bible in theWord program.
Continue reading Bibleview Changing the Bible Font in theWord
Class Objective: This class will briefly show you how to select a Module Set.
Requirements: If you don’t have any module sets made, you will first need to learn how to make them. See the sidebar “Module Sets” or the How to Make Module Sets post.
Once you know how to make module sets, and you make some, you will need to select them to use them. This is very easy.
First of all, module sets only work with the Bookview window, so open a Bookview window (F12). Now look for the Green icon in the upper left hand corner of this window. Click on it.
To select one of your module sets, click on the green books icon.
Here you can see I have several module sets (upper yellow area), with Commentaries All currently selected.
Note that theWord comes with no module sets pre-made. These module sets totally depend upon what modules you have installed so there is no way for the program to come out of the box with these premade.
You need to make your own before any will show up on this pop up menu.