Must-know tricks and procedures of theWord is a class for the beginner in theWord. These tricks or methods or procedures are absolutely necessary for the user to work well in theWord. They should be the first things he learns how to do in theWord program.
Category: Tips & Tricks
How do I show the BibleView Window Options Icons (at left)
BibleView Window Options Icons
Topic: How do I show the BibleView Window Options Icons (at left)
By David Cox
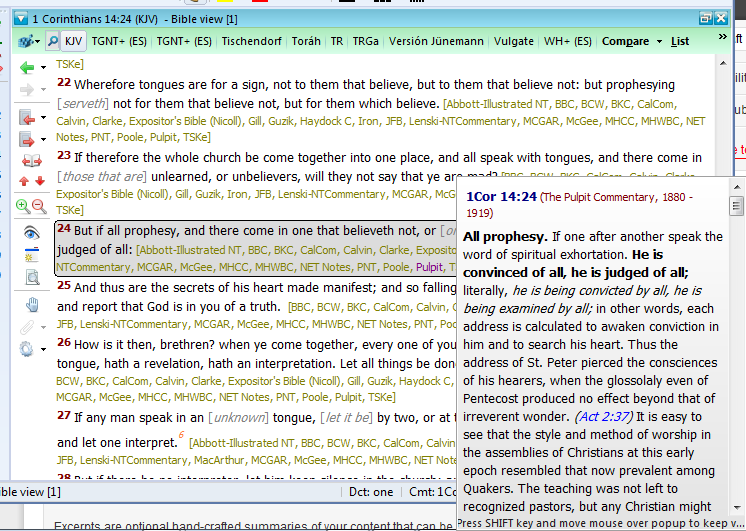
BibleView Window Options Icons. When using theWord, at times you accidentally press a wrong combination of keys, and you are left with something you don’t want. I have been using theWord working in a Bible, and all of sudden the entire left-hand icons disappear on me, well actually, I pressed the wrong keys and they disappeared on me.
For most things with theWord you can go to the main menu at the top, and you can search there for turning something on or off. But in this particular case, you will need to know how to do this while you have the Bibleview window in particular active. Then it is very easy.
Tip: So if you do not see the left-hand menu Icons in your BibleView. If this is the case, then press Ctrl+T to toggle it on/off or hide/show.
Note that YOU MUST FIRST CLICK IN THE BIBLEVIEW WINDOW TO MAKE IT ACTIVE or this won’t work.
See the image below (icons on left ) for an example of a BibleView Window with this icon column.
Help Tutorial by Paul Chapman
Paul gives us an overview of how to use the left-hand icons in the Bible View window. He explains several of the icons and what each one does.
More Articles from this Category
- YouTube Views Verse Lookup
- Where is Strong’s Numbers in KJV?
- Using theWord Commentary Links
- Using Inline Commentaries
- Two Linked BibleView Windows
- theWord Installing Bibles
Using Inline Commentaries
CLASS OBJECTIVE: In this tutorial class, I will show you how to use theWord inline commentaries function.
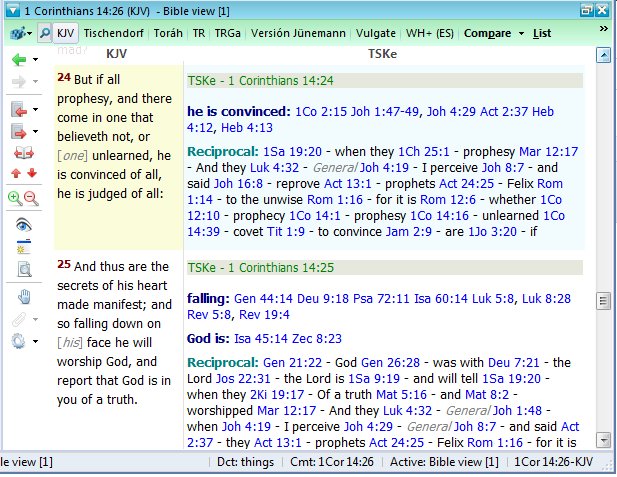
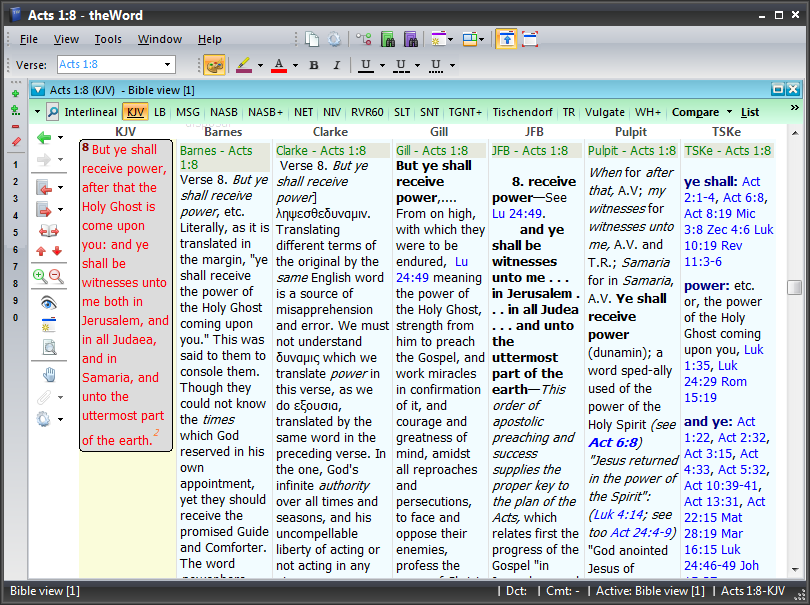
What you see below is a simple BibleView window (KJV on left, commentary on the right). What makes this such a powerful tool is that you can set your commentaries in this inline commentary function, and you can read through/study through a passage of Scripture and read the commentary with it quickly.
Before we get too involved in this one, there is a short-cut key to do this, which first is clicking in the BibleView Window you want the commentaries to appear in, and the typing a single letter:
N – Toggles the commentaries off (hides them).
C – Shows the commentaries below the Bible verse.
T – Show the commentaries besides the Bible verse (see image above for an example of this).
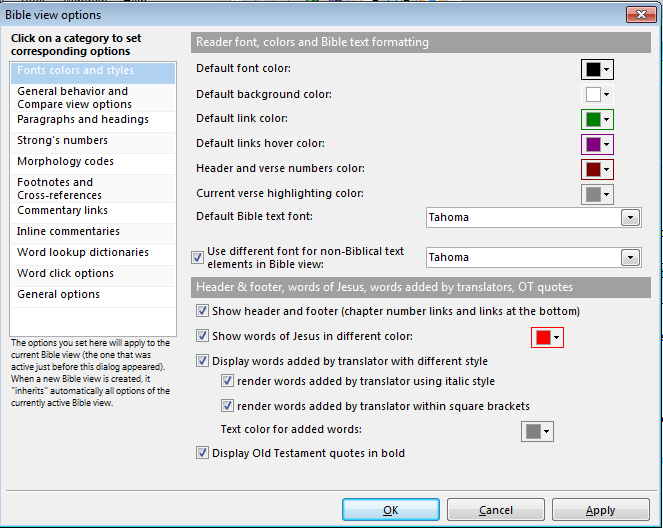
Note that there are two very distinct things here, your quick access to BibleView functions and options, and a full access to the options involved. If you click on the wheel or cog, then you get the full access to set the BibleView Window options. If you click on the down arrow beside the wheel, you will quickly activate or deactivate (hide or show) one of these functions.
Once having activated the BibleView Window (clicking in it), then you press Control+O to get into the toggle to show this. At this point, you should see something like this.
Now we want to click in the left-hand window to get to inline commentaries section.
More Articles from this Category
- Using theWord Commentary Links
- Using the Commentary Template
- Using Inline Commentaries
- theWord Book Summary, theWord chapter summary
- New Optimized Commentaries
- Module Set: Commentaries
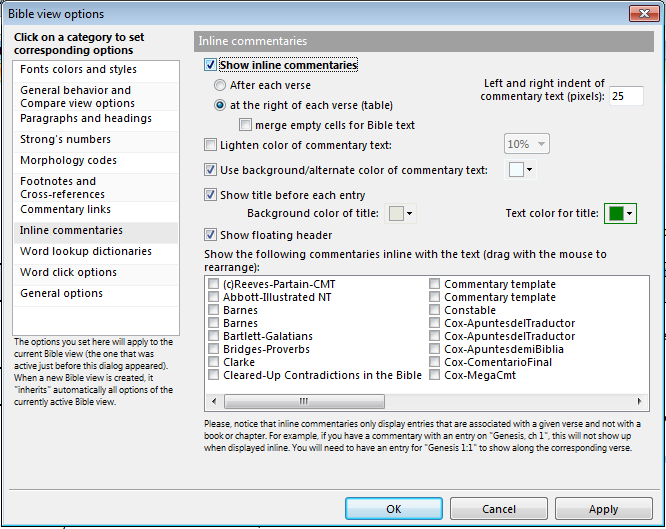
What we see here are the settings for the inline commentary. (Above to activate it by short cut keys, and here in this dialog box you click the topmost checkbox to activate or deactivate it.
You can play with these options to change the “look and feel” of the commentary, but the important point here is that in the mini-window with the listing of your installed commentaries, you can check off the ones you want to see in the inline commentaries.
Note: You see double commentaries because you have more than one installed. In my case, I have some of these commentaries in a “commentaries” folder, and some in the main “books” folder in this installation, and as such, they appear twice. Don’t let this bother you. You can delete the redundant ones if you so desire. It doesn’t hurt to leave them either.
Here I am going to check off my recommended commentaries:
Recommended Commentaries
Click link name of the commentary to go to the download page for that module. All these commentaries are free by the way.
- TSKe – Treasury of Scripture Knowledge Enhanced by Tim Morton
- Barnes, Albert – Barnes Commentary on the Bible
- Lange, John Peter – Lange’s New Testament Commentary
- Spence, H.D.M. – The Pulpit Commentary
- English Annotations on the Holy Bible by Matthew Poole, 1685
- Matthew Henry’s Whole Bible Commentary
- Gill Commentary on the Bible
- Guzik Commentary on the Bible
So this (below) is something like what it looks like:
The power of theWord is seen when you set this up, and can quickly scan through a passage and see various different commentaries quickly on a given passage. theWord saves you time, gives you power. Study the image above. This is really a great, powerful tool for Bible study. You cannot underestimate how much you can do with these tools!
Conclusion
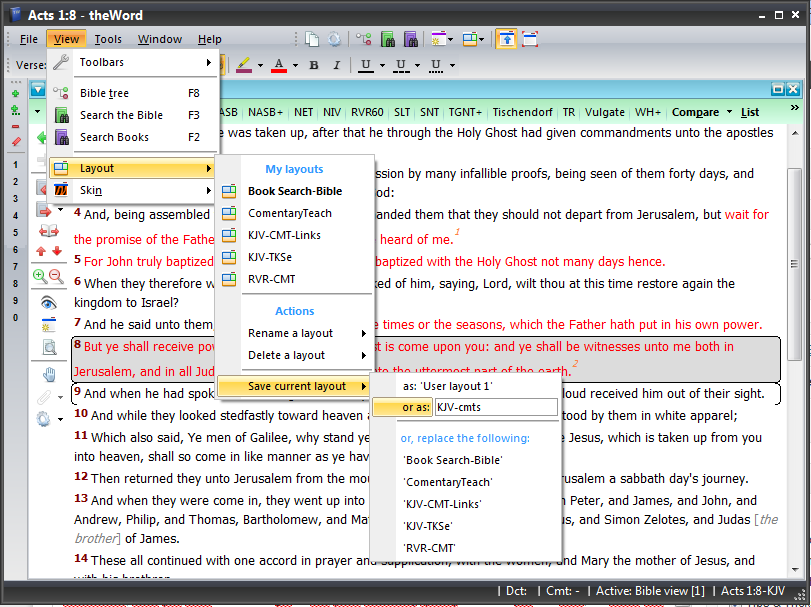
Remember, what you want to do is to get to this point extremely quickly. So once you are here, To make this into a screen layout, Go to the main TW menu, View-> Layout -> Save Current Layout – (name it)
This video goes through making a text sermon using the Commentaries inline.
https://www.youtube.com/watch?v=JeBXJCgIAmY
How to install theWord Modules
OBJECTIVE: To show the user how to install different types of theWord modules into their theWord program.
See also FAQ: I installed a module and it doesn’t show up.
General Install Info
First a little explanation about modules and the theWord program. The theWord program is a program that works with modules which these modules is where the actual information is contained. Each module (Bible, commentary, dictionary, or book) has it’s own format, and absolutely needs the main theWord program to work.
If you compare this Bible program to the Microsoft Word program which many people use daily, we see the way theWord works. First of all, Microsoft Word has its’ own program files which it keeps in the Windows programs folder. Then you open Microsoft Word and “look for a Microsoft Word document”. The Microsoft Word documents can then be read, edited (if allowed), or a new one created.
This is basically how theWord Bible program works, except the way to find an existing file is a little bit different. Here a key important difference is that you cannot create or copy a new file into theWord and it “sees” it like in Microsoft Word. Once you get the new module into the right place, you must close down complete theWord program and restart it anew.
Another key important difference you need to keep in mind is that theWord has special folders where it keeps its modules. You absolutely MUST put a new module in one of these folders or TW will not recognize or “see” it.
At this point, we need to recognize that “what is out there” in Internet land is greatly different from one place to another. You will find modules using the TW installer, modules in ZIPped, RAR, or other compressed formats, and even raw TW modules just as the program uses them. How do you install these? In the menu on this page, we will go through each type of installation.
How TW knows what modules are available
Basically theWord scans all of its folders on start up and registers each of the modules it finds there. NOTE: Once running, it will not register any new modules, except those you create from within the program.
When it does this scan of its folders on start-up, it will index all of the modules which were not previously indexed (all new modules specifically, or if you change the name of module while the program wasn’t running). This process can take some time, but it is a one time thing for each module you have. If you download 500MB of modules, don’t think TW will scan all those modules, index every word in each of them, and start the program all in a few seconds. That process takes some time, and that is so that when you search for a word in a module, it will be faster.
Regular TW Installers
This is the best and easier way to install a TW module. You do not need to know anything to install this type of module (ending in *.exe). Just run the exe, and the TW installer will detect where the modules should be put, and it will put them there. If you want to install them to a USB flash drive, or to a Compact TW installation in a folder on your hard drive, then see the last page on this page,”Installing to a Compact setup.”
On my theWord library site, http://www.twmodules.com/ all of the modules are available in official TW installer exe’s so that you do not have to battle with copying the modules into the correct folder.
The only exception for this is the megapacks, which are 2-3 zip compressed files with all of the files for that particular month. The reason why I do not have these as TW installer exe’s is because people who use theWord on MAC and Linux have a lot of problems using the TW installer exes, and they prefer to download a zip, uncompress it, and use the modules that way. It is a laborious process for them to individually work through 100 files in those operating systems (converting them from Windows format to their own operating system formats, or whatever).
If you want to install a whole month’s worth of modules at a time, then this is the way to go.
See also FAQ: I installed a module and it doesn’t show up.
Installing TWmodules.com megapacks
These megapacks are available at
http://www.twmodules.com/megapacks/
usually one to three months after the month has closed.
After you download the zip file to your computer, you need to decompress the files. Basically, the place to copy them to and decompress them to is
c:\ProgramData\The Word\
Please note that theWord will allow you to modify where these files are kept, so the best way to know where to put them so that theWord can find them after the program starts up is to find where it is looking for its files (in which folders). I have a special post answering the question of how to find these folders.
See also
FAQ: I installed a module and it doesn’t show up.
Where does TW keep its files?
Finding your module folders
In various of these situations you will need to find out where TW keeps its files (in what folders on your hard disk). For that please see this post…
See also
Where does TW keep its files?
FAQ: I installed a module and it doesn’t show up.
Compressed archives (exe)
Sometimes you will get a module from somewhere that is an exe, but when you run it, it asks you where to install (copy) the file. This is basically not an installed, but rather a compressed archive file made into an exe. For these types of files, you must first find out where you want to install it (what type of theWord installation you have, normal or compact ), and if compact where is it, and then run the exe.
For installing to a Compact TW installation folder, install the modules in that folder.
For installing to a USB Drive, when you are presented with where to copy the module to, chose the USB drive, and then the “TheWord” folder.
“Raw” modules and simple zipped files
When you download a module, or somebody gives you a module, and it ends in the extension *.twm, this is a raw module. It is just as the TheWord program needs it to use it.
First you need to know what type of theWord installation you have, or where you want to put these modules (a normal installation or a compact installation).
From there, if you want to install the modules into a compact installation, then just copy the modules (ending in extension *.twm) into that folder or USB drive (in the TheWord folder).
If you have a typical, normal hard disk installation, then copy your new modules to
c:\ProgramData\The Word\
(This is for Windows 7.) Basically after Windows Vista, Windows has two main program folders,
c:\Program Files\
c:\ProgramData\
Within these folders there are subfolders with the name of the particular program whcih is where that program keeps and uses its files. These two folders are maintained by Windows for when you install programs. Note that in Vista and Windows 7 and thereafter, you cannot install any file into the c:\Program Files\ by simply physically copying the files into that folder. The reason is because Windows security will allow you to copy the file there but you cannot run or access the file in any way once there. So DO NOT COPY your modules to c:\Program Files\, but rather to c:\ProgramData\The Word\ which is permitted and where you should copy them.
If you download my TW Megapacks from my site
http://www.twmodules.com/megapacks/
then you will need to use a compression utility to uncompress the modules (Windows after Vista has this built in), and then physically copy the files to
c:\ProgramData\The Word\
Then you need to shut down theWord (better to do this beforehand) and then restart theWord. Your modules should appear in theWord.
See also
FAQ: I installed a module and it doesn’t show up.
I want to give a module to a friend
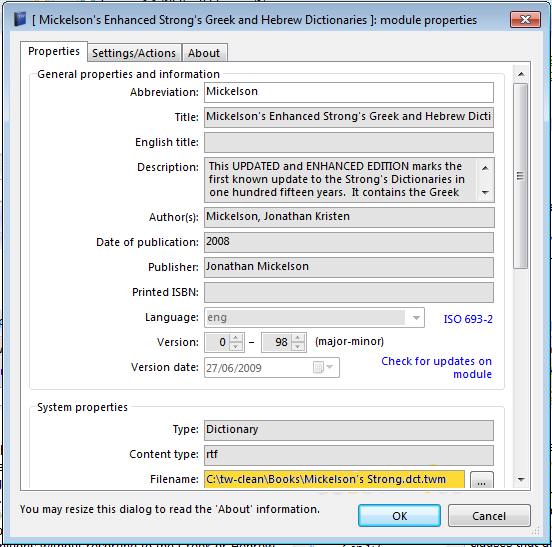
The process to do that is to first check that you have the module yourself (find it within theWord). Right click on its title in the module selector bar (or if it is in a folder on that bar, the title of that folder). In the right click menu that appears, select module properties and look down for the module’s physical location on your hard drive (highlighted in yellow in the image below).
From there, note or write now that location. Go to that location (click on the elipse, or three periods after the location in the image above which will open a Windows FIle Explorer on that location). From there you have the file to send to somebody else.
A few notes are in order here.
First, the file is locked by the TheWord application, i.e. you cannot move the file, delete the file, nor change it’s name. You must close down theWord before any of those things become available again. You can open a Window file Explorer, and then go back to theWord and shut it down leaving the Window Explorer open though.
Second, if you are considering send the file to a friend or to somebody, note that if you compress the file using theWord’s own compression function, it will be as small as it can be without having to “decompress” the file on your friend’s computer. How do you compress a module?
See post
How do you compress a module?
A final note, please note that some modules (premium modules that are only obtained legally by paying for them) should not be shared with your friends. Send them a URL link where they can pay for them and download them. For those who wish to pirate or share purchased modules, see the next topic “Premium (purchased) modules”.
Premium (purchased) modules
The bain of these Bible software programs is that they have no respectability among the world. Companies like Christian editorial companies or Bible Societies do not what their material in the format of the free Bible programs (like theWord or e-Sword) because of pirating. Besides that, copying of copyrighted material via putting it in the format of these programs is illegal, and immoral.
In general you should forget about trying to do something like this. Costas has devised a very effective way where in you must register your premium modules, and only the person who purchased the premium module will actually get it working in his computer.
Installing to a Compact setup
When you install (even with a TW installer exe) module to your computer, in general you want it to go to the correct folder on your hard disk which is where TheWord is installed. If you have a Compact setup, that default place is not correct.
In using an official TW installer exe, you will be given an opportunity to install you module(s) to a specific folder instead of where TW normally installs when installed on a hard normally. At that point you will need to know the actual folder of your Compact installation or the drive name if you are using a Flash Memory device (or external hard disk).
More Articles from this Category
- Where does TW keep its files?
- What Operating System does TheWord require?
- Tips and Tricks
- theWord required hardware
- theWord Bible Software (1 of 4): Downloading and Installing
- Specialized theWord Study Area
theWord watching Clipboard doesn’t work
TIP: theWord watching Clipboard doesn’t work
When using theWord with two different languages, sometimes it seems as though the theWord watching Clipboard doesn’t work. Actually, it does, but it will only watch for references according to the language you have active at the moment.
theWord Bible Verse List Feature
theWord Bible Verse List Feature
By David Cox
Class Objective: To gather a list of verses together to paste into a Word Processor or use within TW.
Note: This feature of TW is available when you click on the “List” icon on the Bible Selector Bar.

